I have owned several 1911s over the years. At one point, I was shooting and carrying them exclusively (until I got tired of the maintenance as my yearly round count increased). Eventually I sold them all and moved into Glocks – a soulless gun that I have never loved like a 1911 but that I appreciate for its workman like performance. Last year, I decided that I needed at least one 1911 in the collection for old time’s sake and to stay proficient. It also seemed like a good reason to try Magpul’s affordable 1911 grips.
I like my handguns to have fairly aggressive texture. Texture can help make up for injury diminished grip strength, aids recoil control, and helps deal with sweat/mud/blood/gun oil. I chose the MOE 1911 Grip Panels with Magpul’s TSP texture. The TSP texture is excellent. It’s pointed trapezoidal (TSP stands for Trapezoidal Surface Projections) texture elements are as aggressive a texture as you will find on a factory produced item. The TSP texture, along with the somewhat angular cross section (more of a triangular cross section than a typical half circle) of these grips does a great job of locking the 1911 in your hand.
Polymer, while a little low-rent in perception, is actually a great material for grip panels versus something like wood or G-10/micarta. Durable polymer allows for aggressive texture at a low cost, light weight, and without being as grabby to your covering garment as something like G-10. Magpul’s polymer always seems to hold up well and, while the grips aren’t quite as sharp as they were a year ago, they are still very aggressive. 1911s are heavy to begin with so saving a little weight in the grip is a welcome feature, as is the low price.
The overall design of these grips is excellent, especially the deeply dished out magazine release relief that is molded into the grip. There is no texture in this area so your thumb isn’t abraded as you move it to the mag release. It is deeply dished out from the back of the grip all the way to the front which should allow a wide variety of hand sizes to more easily access the magazine release without shifting their grip much.
I don’t typically like to talk about looks but on a classically handsome gun like the 1911, it is bound to come up. These grips look great on the right gun… to me, at least. They are going to look a little strange on a classic, blued Gold Cup but they look right at home on a modern, “tactical” 1911. I mostly don’t care how they look since they offer the function that I want at very affordable price.
I already own a pair of excellent micarta grips but, if I didn’t, I would have a hard time justifying the price of them over these Magpul grips. These are truly functional grips and a very affordable price. Put your fancy wood grips in the safe for special occasions and pick up a set of these.
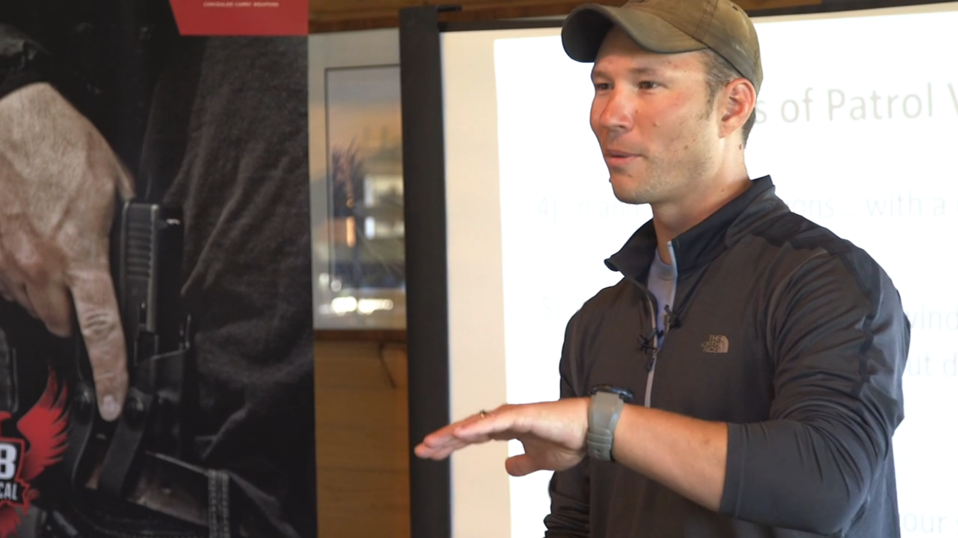
I was given the opportunity to review Vehicle CQB with William Petty – an on demand training video featuring instructor William Petty and produced by Firelance Media. The video seeks to give shooters tools that they can use in a conflict that takes place in or directly around a vehicle and, along the way, it slays more than a few sacred cows.
Video Training Done Right
Much of the video training content that is out there walks the fine line between entertainment and training. There is always some value in viewing training content but it will never be a replacement for in-person training with a skilled instructor. Video remains a powerful medium for conveying ideas but is more limited for conveying skills.
Vehicle CQB works so well as a video because it isn’t necessarily a shooting skill course. It is more of a problem-solving course. The handling of basic shooting positions is a great example of this. The video doesn’t teach you the basic shooting positions. It shows you how they might be used when fighting around a vehicle. That is an important distinction and one of the biggest reasons this video works so well.
This is very specific material that most people would never have access to outside of video. Most ranges don’t allow you to shoot vehicles and courses like this are hard to find for the civilian shooter. The material is presented with a depth that could never be accomplished in a shooting course. This type of depth can only be presented in a vehicle specific course or video.
Vehicle CQB is heavy on ideas rather than specific skills and it presents subject matter that would otherwise be inaccessible for most people. This video is what video training can and should be.
Quality Instructional Design
Vehicle CQB is very well executed from an instructional design standpoint. The format of the video and logical progression will feel familiar to you if you have ever attended a shooting course from a quality instructor. Objectives and context are given, the basics are built upon, new information is introduced, and then the students are expected to apply that new information in drills.
The video follows a group of students through a Vehicle CQB course as taught by William Petty. As with any good course, it starts in the classroom where objectives are set and context is given. This initial lecture phase sets the table for the instruction that follows on the range.
The range portion of the video takes place over three days with each serving as a subsequent block of instruction with a debrief at the end of each. The first block teaches the student how to use and tweak the shooting positions that they should already know to be more effective around a vehicle. These are not new shooting positions but rather refinements that are applicable for use around any cover, not just vehicles.
The second range block introduces the ballistic concepts that set this video apart. I don’t want to give away to much in this review but it was paradigm shifting for me. I have attended shooting courses before where the extent of the vehicle related instruction given was something to the effect of “Only the wheels and engine block are cover” or “Vehicles are bullet magnets and you should get away from them ASAP.” Petty systematically shows, caliber by caliber, that there are many more points of cover than that to be found on a vehicle. This is powerful content when you consider that we spend a significant time in vehicles on open road where cover is sparse. There may not be other cover to run to so it makes sense to know how to maximize the only cover you have rather than exposing yourself needlessly by leaving it.
The final range block finds us on the range with Petty and his students while they apply their new found knowledge. The drills are many and varied. They include students working along and in pairs to exit a vehicle while engaging cardboard targets, drills that are heavy on information processing, and some very illuminating force-on-force drills. There are plenty of ideas here that you can incorporate into your own training even if it just dry fire. The force-on-force content in particular is excellent in that you get a chance to see many of the concepts introduced earlier by Petty playing out exactly as he said they would in a dynamic way.
The debriefs that follow each range block do a good job of personalizing the training and driving home the main points. There are also interviews with Petty interspersed that gives us a window into his mind and these do a good job of delving deeper into the context of the course.
Context is Key
Petty does an excellent job of giving context in this video and that is something that is often sorely lacking from training videos. He sets the overall context early in the video in the classroom portion and then doesn’t deviate from the theme of armed conflict happening in and around the immediate area of a vehicle. Even the familiar aspects of this training like shooting positions are handled within the context of Vehicle CQB. This specific context and very limited scope is key to understanding what is being conveyed in this instruction.
He also gives rich depth of context to two specific techniques that, without context, are often regarded as cool guy stuff for internet operators – urban prone and temple index. I have never seen urban prone taught in such a complete way or, frankly, a way that makes so much sense. Petty shows graphically its utility for shooting under objects like vehicles and why more traditional prone positions fall short in this context.
Temple index has been particularly controversial as of late but that is largely due to it use out of context as some sort of default ready position. Petty shows the correct (as in safe) way to do it, why it is preferred to other positions in this context, and when it is applicable. As he says, “That shit is not hot sauce, you can’t put it on everything.”
William Petty as an Instructor
I’ll qualify this by saying that have not met William Petty in person. However, he comes across as very personable in the video (and all the various outtakes released by Firelance Media). He seems warm and humorous with a laid back style and a willingness to demo the concepts that he talks about. You’ll come away from this wanting to train in person with him.
His command of the subject matter really shines through. The second day is spent shooting vehicles with calibers ranging from 9mm to .308. During that entire day of filming, everything happens as he says it will which indicates that he has spent a lot of time shooting cars for research. On the third day, all of the concepts that he introduces are born out in the force-on-force scenarios in the exact way he presented them. All of this points to a man who has done his homework.
Slick Presentation
The overall quality of the presentation is excellent. It looks great. The camera is seemingly always in the right place to see exactly what Petty is demoing or the students are working through. The editing keeps the pace lively without glossing over important details. It feels very polished and complete. I highlights what needs to be highlighted and uses clever editing to emphasis important points. It feels like you are in the course, following the progression but also outside of it, picking the brain of the instructor.
The video is delivered via Vimeo. Accessing it was seamless and streaming it in HD was easy, even on my North Idaho DSL connection.
Wrap Up
I realize that I have barely touched on the specifics of the content in this video and that is by design. It is always a challenge to write reviews like this without giving up too much of the content. Rest assured, the ballistic content alone is worth Vehicle CQB’s cost. It is even better when you consider how it is expertly woven into the overall presentation.
The content will change how you think about any vehicle and the context given will change how you think about various techniques. Seeing the concepts play out on video exactly as they are introduced by Petty will give you confidence that you can take his word. Vehicle CQB progresses logically and is easy to follow. It is an entirely appropriate and effective use of video as an instruction medium.
When I first received the Flat and Straight Trigger, it was the only option that Suarez International (SI) offered. Since that time, SI introduced a “Patrol Grade” version and the original became the “Tactical Grade” version. There will be more on these distinctions later.
Overview
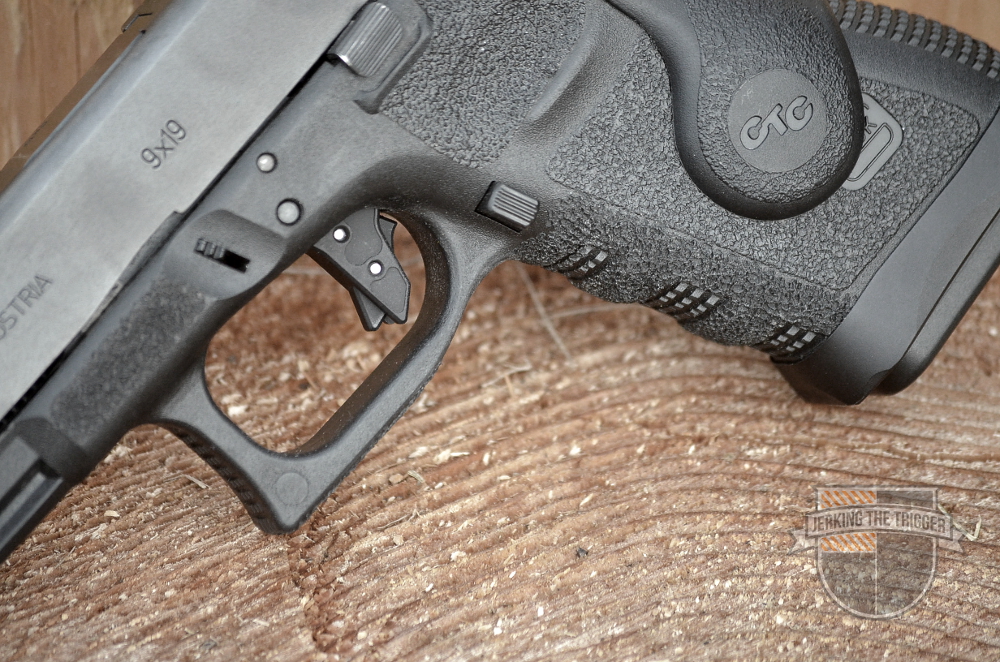
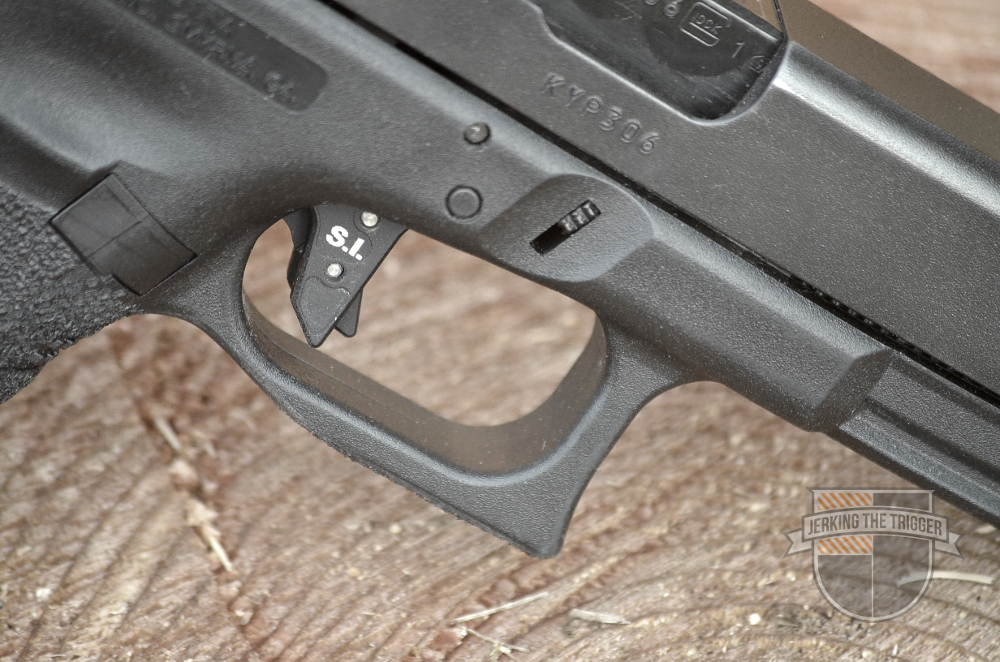
The Suarez Flat and Straight Trigger is very aptly named. It is a replacement trigger for Glocks with a flat and straight aluminum trigger bow. The Tactical Grade version that I tested completely eliminates pre-travel.
Observations from Use
I have just under 1200 rounds on this trigger. All of those rounds were split between 2 guns: a G19 an G35 with KKM 9mm conversion barrel and ALG Defense 6 Second Mount.
I’ll cover the pre-travel elimination first because it is sure to cause the most controversy. Pre-travel is usually a fact of life with Glocks and, at first glance, it sounds great to completely eliminate it which this trigger does. There is almost no pre-travel – only an impressively crisp break. However, savvy Glock shooters will know that, as with other triggers on the market that eliminate pre-travel, this reduces engagement with the drop safety shelf. On my example, there is still some engagement with the shelf and the firing pin safety is still completely functional along with the trigger safety.
In order to test the safety of the trigger, I installed an orange Glock armorer’s plate to allow me to view the drop safety shelf from behind and then proceeded to drop my G19 onto the back of the grip and back of the slide several times from waist height. The trigger never budged. Satisfied with the results, I chambered a primed case and repeated the test from shoulder height. I dropped the G19 ten times onto the back of the slide and the primer was never ignited.
In my experience with this trigger there is enough engagement with the drop safety shelf and enough redundancy with the other two safeties to render this trigger safe. However, it is understandable that some users would want to avoid even a reduction in a safety feature which is why SI came out with their Patrol Grade version of the same trigger which leaves the pre-travel intact. Options are a very good thing in this case.
Moving on…
Everything about this trigger feels great. The trigger face is not only flat and straight, it is wide and the trigger safety tucks away into the trigger bow completely flush. The trigger safety is also considerably wider than the OEM trigger safety which makes very comfortable under the pad of your finger. You might notice that this trigger is also a touch shorter than most which eliminates the pinching between the trigger and trigger guard that some users see with the OEM trigger. All of these things combine to make this the kind of trigger you can use all day for several days in a handgun course with no discomfort.
There is almost no pre-travel at all. If you really pay attention, you can feel just a bit but you will never notice it at speed. I can’t really impress how little pre-travel there is with words. You place your trigger finger on the trigger and feel a solid wall which just breaks as you apply pressure. When combined with all of SI’s trigger parts, my G19 averaged 4 pounds exactly over 10 trigger pulls measured with a Wheeler Precision trigger scale.
The reset is very Glock-like in how positive it is but the aluminum trigger bow gives everything a crisper, more mechanical feel. It is very perceptible and easy to find. This crisp reset coupled with the pre-travel elimination makes this trigger impressively fast. When it resets, you can’t miss it and you are right back on the break point of the trigger – click, bang, click, bang, click, bang, and so on. This is the type of trigger that will make you want to find the limits of your recoil control so you can keep up with it.
I also found that this trigger does a great job of basically forcing proper trigger finger engagement. It is wide enough that it will feel strange if you use anything other than just the pad of your trigger finger. It’s flat trigger bow means you can place your finger anywhere on the height of the trigger bow and have a similar feel. This trigger isn’t a replacement for training but it does a good job of reinforcing the fundamentals.
Wrap Up
I have tested my particular example in my particular gun enough to be satisfied with its safety. If you are going to use a trigger like this, I highly suggest that you do the same. In fact, that is a good policy with any piece of gear.
If the Tactical Grade version of this trigger and its pre-travel elimination gives you the heebie-jeebies, consider the Patrol Grade version. Both versions offer a lot of value in the form of a well shaped trigger bow, a satisfyingly mechanical feel, and a very competitive price. This is a great trigger.
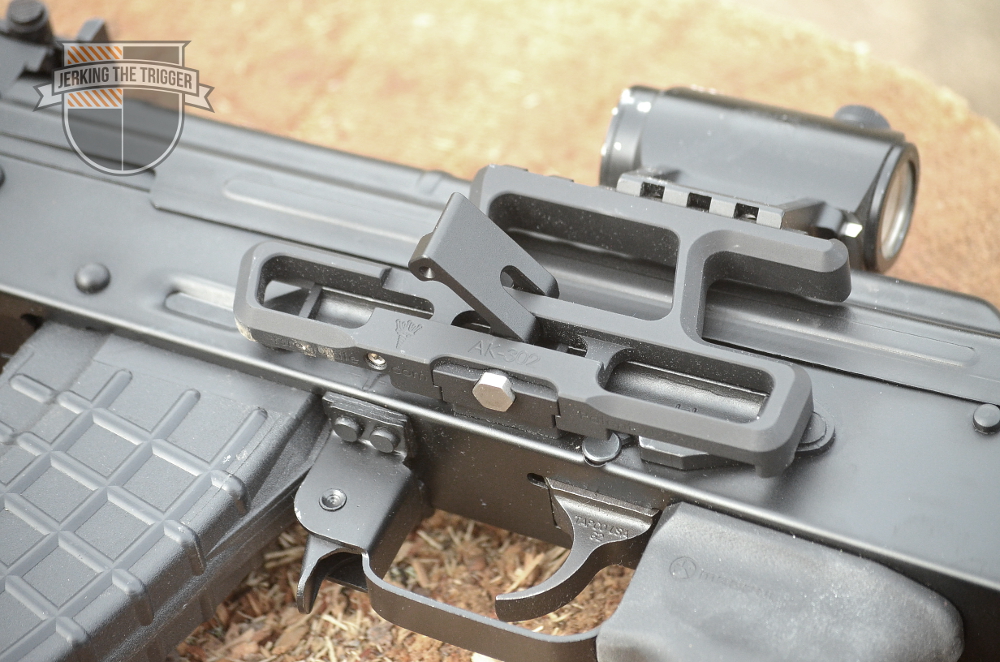
There was a time when I would have said that side optics mounts on AKs were not really a viable solution or at least they had been surpassed in usefulness by other options. They didn’t work well with modern optics, they were heavy, they might not center the optic over the bore, they often had excessive height over bore, and they were very clunky in general. RS Regulate changed all that with the introduction of their original AK side mounts. Later, with the release of their improve AK-300 series mounts, they cemented their place as the best AK optic mounting solution.
Overview
The AK-300 series mount system consists of upper and lower mount components. Basically, you select a lower mount based on your rifle or placement preference (forward or rear) as this is the part that interfaces with the side optic rail. The upper mount components is dictated by your optic and attached to the lower mount. You need both in order to attach an optic.
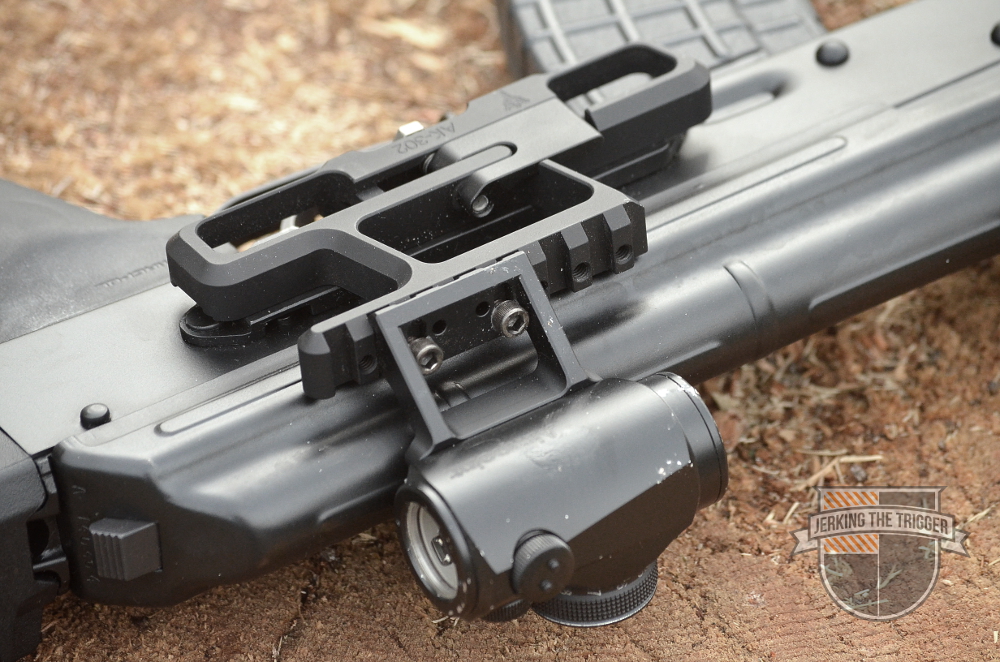
The lower mount attaches to your AK side rail and is available in several configurations. The AK-301 (the most common lower mount) fits most AKM rifles with side rails and allows optics to be place in a more forward position. The AK-302 (the subject of this review) fits most AKM rifles with side rails and allows the optic to be placed more to the rear of the rifle. The AK-303 is the same as above but with a full length rail that allows for a variety of placement or for use with longer optics. There are also other lower mounts available for other rifles like the VZ.58, Yugos, PSLs, and more.
The upper mounts are available to interface with a variety of optics. This review will utilize the AKML upper mount to mount an Aimpoint Micro (R1).
Both the upper and lower components of the AK-300 series mounts are machined from 6061-T6 aluminum and are hard anodized for durability. The locking lever is adjustable without tools and installs easily. The optic mounting location can be adjusted forward/back and side-t0-side to center the optic over the bore. Once the user is happy with how the optic is centered, they can choose to pin the upper and lower mounts together with supplied pins.
The mounts sit low enough to allow a 1/3 co-witness when used with most red dot sights. In some configurations, the dust cover can still be removed for cleaning with the mount installed.
Observations from Use
I have been trying mounting Aimpoint Micros closer to the eye in order to acquire the dot sooner and more easily from awkward positions (there may be an article on this later). That is why I chose the AK-302 lower mount for use with my DDI Zhukov. The AK-302 is RS Regulate’s “rear-biased” mount that allows the optic to be place further to the rear of the receiver.
This configuration works well for me with one caveat. Mounting the optic to the rear ON MY PARTICULAR RIFLE does not allow the dust cover to be removed with the mount in place. It repeats zero well enough that this is a non-issue for cleaning/maintenance but does add another step to certain types of malfunction clearances that may require removing the dust cover. I have tested it with 3 other AKs in my collection and it allows the dust cover to be removed. I suspect that the AK-301 forward-biased mount would allow field stripping on this particular rifle and I plan to try that as funds allow.
The repeat zero capability for this mount is more than sufficient for its intended purpose. I have taken it on and off my AK countless times during the review process and the zero has never wondered outside of what is noticeable on an AK with a red dot sight. That said, this has spent most of its time mounted on a DDI that is impressive in its accuracy and there has been no discernible shift.
Durability seems to be excellent. While taking pictures for this review, the rifle fell off a wood pile that I was photographing it on. It tumbled all the way down the pile and hit the optic and mount several times with scratches and pine pitch to prove it. There was no bending or breaking. I confirmed that the dot still co-witness with the sights and have since shot it several times on paper. There was no loss of zero.
The weight on these mounts is nothing short of amazing. The upper and lower mount combined weigh in at a scant 3.25 ounces. That is actually less than RS Regulate advertises and within about a quarter ounce of typical AR-15 mounts for Aimpoint Micros. It’s light weight and placement over the receiver means that it basically has no effect on the handling of the AK. The scale will tell you its there but when you are actually shooting your rifle, there is no discernible effect on the balance of the rifle.
It is also impressive how low profile this mount is. The QD lever sits flush with the mount itself. The entire setup adds very little thickness to the AK itself. On top of that, RS Regulate was careful about ensuring that all corners were beveled which further enhances just how svelte the mount feels.
The stars have really aligned for RS Regulates mounts. They have a quality that stands on its own but with the arrival of a quality, readily available right-side folding stock (Magpul Zhukov), it makes more sense than ever to give one of these a try. Having a folding stock that will fold with the mount in place removed one of the final barriers for me to try a side mount.
Wrap Up
In my experience, the RS Regulate AK-300 series mounts are the finest optic mounts available for the AK family of rifles. They repeat zero, hold up to abuse, work with today’s best optics, place the optic low enough to co-witness with your iron sights, allow field stripping without being removed in most cases, and weigh very little. I am done burning my fingers on railed gas tube replacement type optic mounts.
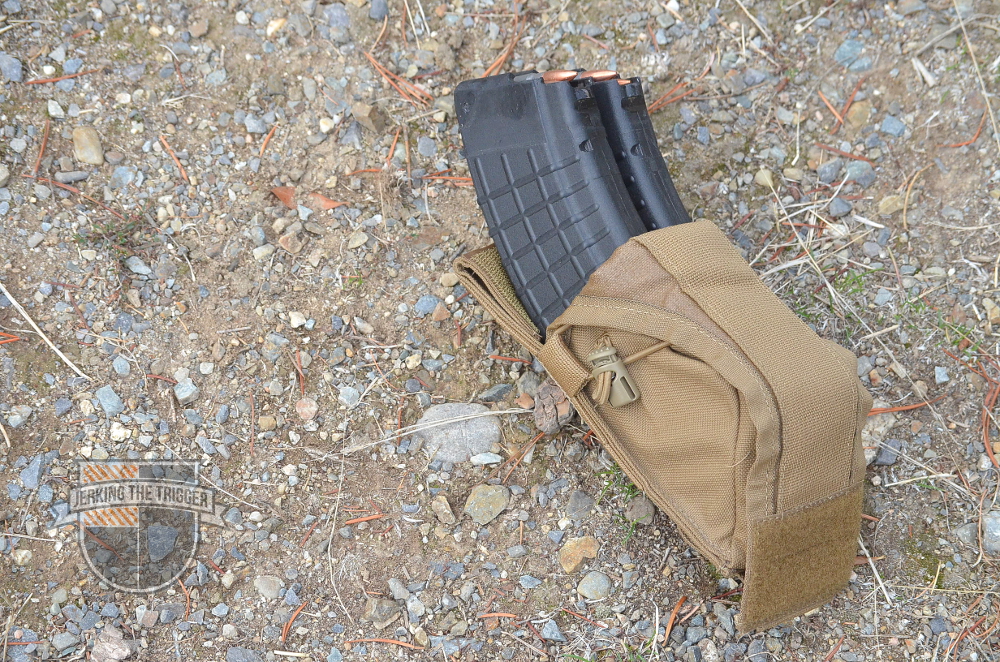
This review has been a long time coming. I have been working with Zulu Nylon Gear’s AK/VZ58 Double Magazine Pouches and they are so different from anything else that I have tried that I felt the need to put a lot time behind them. I became convinced that I liked them early in the process but I found some nuances that I wanted to work through before I wrote this.
Most of the testing for these pouches was done with them mounted to a Mayflower R&C APC.
Overview
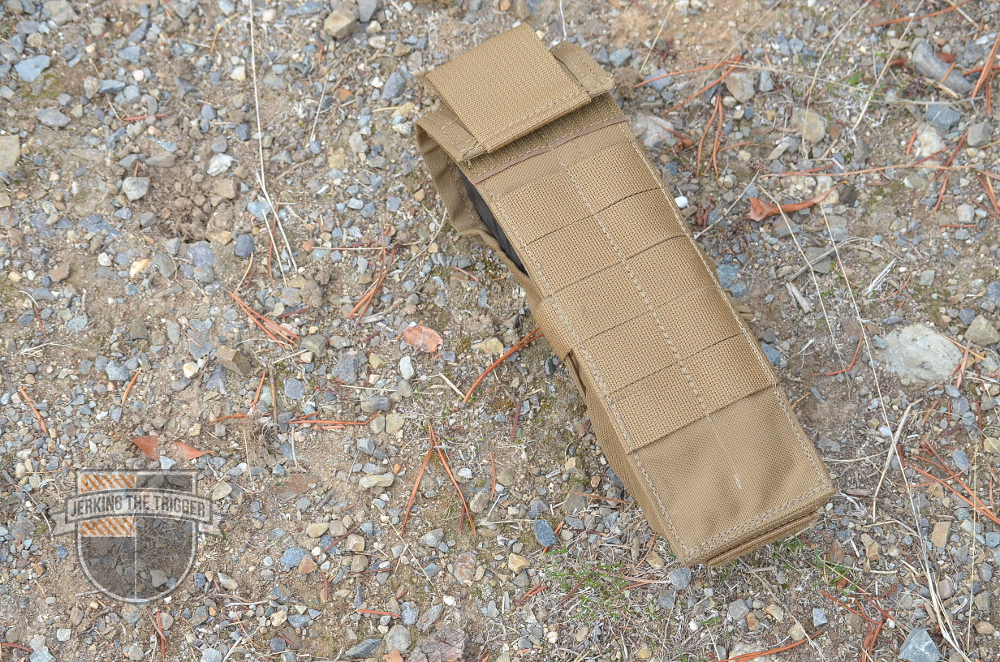
These pouches are designed to hold 2 AK, VZ58, or similar magazines in a cartridge up orientation and many of the unique features support this design decision. In addition to the bullets up orientation, the pouches carry the magazines with their spines toward the wearer which is different than any other pouch that I have used.
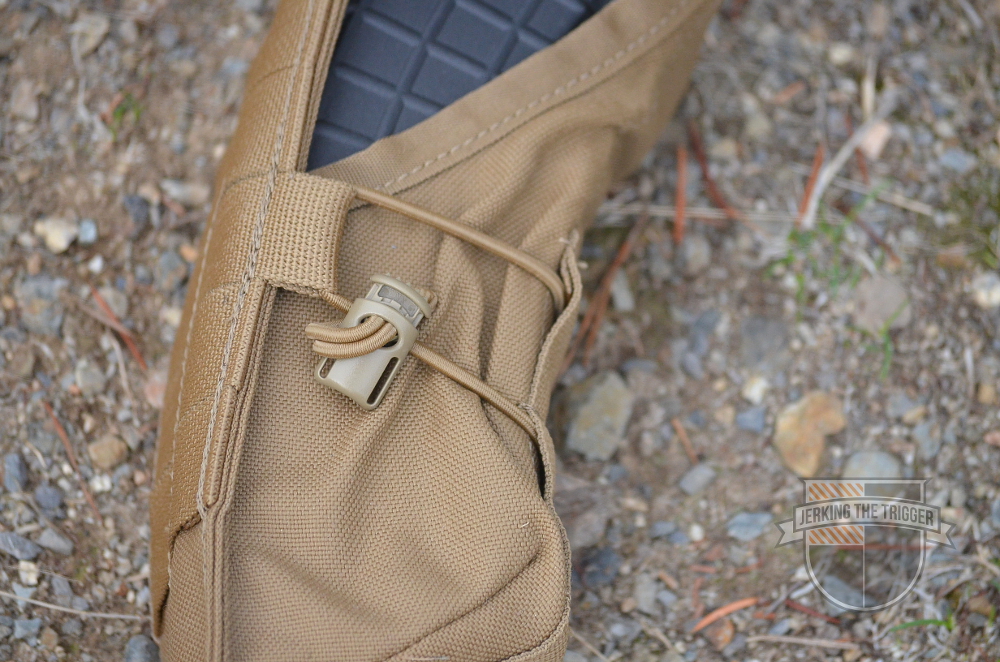
The AK Doubles also make use of Zulu Nylon Gear’s EXCELLENT reverse retention flap. The flaps attach at the back of the pouch and “hinge” at the front. This allows them to fall forward and out of the way of the pouch where they will almost always automatically secure to a small Velcro pad. These retention flaps prevents cartridges from being accidentally stripped from the magazine and servers to retain them when in the closed position.
Observations from Use
These pouches represent a unique approach to a uniquely AK problem. The problem is that AK magazines are easier to manipulate (and therefore faster) during the reload if they begin in a cartridge up orientation. If the magazines start with the cartridges up, the user no longer has to execute the sweeping turn/twist required to bring the AK magazine into a position where it can be rocked into the magazine well that is necessary when the magazine starts with the cartridges down.
Zulu Nylon Gear basically started from the reload and built the pouch to fit rather than most AK pouches which start with an already established pouch pattern and force the reload to fit. It is a completely different approach to making an AK magazine pouch and this, of course, required an entirely new type of pouch. Everything that is “different” about this pouch and how it holds the magazines is driven by this approach.
The magazines are held with the cartridges up and the spines toward the user. This means that the top of the magazine is presented to the support hand with the cartridges already oriented in the same direction that they must be in order for the magazine to be rocked into place. This makes the reload incredibly smooth and without the hitches that come with the typical magazine orientation. AK users have been putting magazines in pouches with the cartridges up for this reason for a long time but I have never seen a pouch take the concept as far as these by placing the magazine spine against the user.
The magazine orientation leads into the next unique feature which is the flap that is necessary to protect the top of the magazines since, without a flap, they would be exposed to dirt, mud, and possible loss of the first few cartridges. Zulu Nylon Gear already had a great design in the reverse flap that they use on their M4 Doubles. They adapted it to use on the AK Doubles and it is right at home here. The curve of the magazine makes the front hinge work very well. The flap very naturally falls out of the way when the user releases it. Even if it doesn’t make good contact with the Velcro pad meant to secure it out of the way, it tends to stay down because of how it folds on itself.
If you find yourself wanting to use the pouches as open top pouches or just need to have them stay open, the flap can be secured to a small Velcro pad on the front and the rear part of the flap can be folded down and secured out of the way with another Velcro pad. I never really used this feature because the flap works so well and does a good job of staying out of the way.
Finally, the fact that this is a double magazine pouch with a flap as its primary retention required the pouch to have a useful secondary retention feature for the times that the pouch is left open after a reload so that the second magazine is retained. This was accomplished via an adjustable bungee tension strap. So you can see that the reload sequence drove the orientation of the magazines which drove the flap design which drove the secondary retention feature. Neat.
The secondary bungee retention is what took me the longest to really use effectively. They have to be kept tight or the second magazine can turn in the pouch once the first magazine is removed. This is not the end of the world since the curve of the magazine will easily allow the user to orient it even if they can’t see it but it sort of defeats the purpose of the pouch. If you run the retainers very tight, that generally won’t happen. The second mag will just sort of move to the middle of the pouch, retained from loss, and ready to be your next reload. The only real downside to this is that it is harder to insert magazines into the pouch when the retention is tight.
I would be interested to see if a flat elastic band would work better as the secondary retention. I think it might make it a bit easier to insert magazines but the adjustability of the current shockcord with toaster-lock setup would be lost.
I was concerned that the magazine pouches would stick out too far from the wearer or be too bulky in some way because of how the magazine are oriented. This turned out to be a non-issue in practical use. There really isn’t that much of a difference because when you go prone, the lower part of the magazine is what you end up laying in. This pushes the lower part of the magazine up against you and the upper part rocks out away from you slightly. This works because the upper part is high on your chest where there is a natural void between you and the ground. There really is pretty much no noticeable difference in terms of bulk when you are prone.
The only other challenges I found with these pouches are common to all double magazine pouches. Nearly every double magazine pouch ever made has had issues with 2 magazines coming out of the pouch instead of just one depending on the design of the magazines being used and loose magazine fit once the first magazines is removed. These are issues that can be worked around by the user.
This is evidence that these pouches are hand-made by a real human person!
Wrap Up
These magazine pouches are different. I understand that there may be some hesitation to try them or even harsh reactions because of that but they are different for a purpose. You can trace the purpose for their differences all the way back to the AK reload itself. I found that they work quite well. They are fast to reload from and easier too since much of the twisting/turning that is typically required is negated.
Like all Zulu Nylon Gear that I have ever put hands on, they are well made and thoughtfully designed. You have to appreciate the approach taken in designing these pouches. It is fascinating how they worked backwards from the reload rather than just making a pouch that holds magazines and making the user adapt to the pouch. I wish more manufacturers approached problems in similar ways.