Archive | Reviews

Review: FIN Designs Ka-Bar TDI Sheath

I am a big fan of the Ka-Bar TDI and I know several of you are, too. It is inexpensive, compact, and intuitive to use. It also happens to be one of the easiest to carry fixed blade knives of all time. The sheath that comes with the TDI knives is functional but it is bulkier than it needs to be and could have better retention. Thankfully, there are numerous kydex benders who make excellent sheaths for the TDI. One such kydex bender is Peter Janda of FIN Designs who has been making kydex for the TDI longer than just about anyone.

FIN Designs TDI Sheath

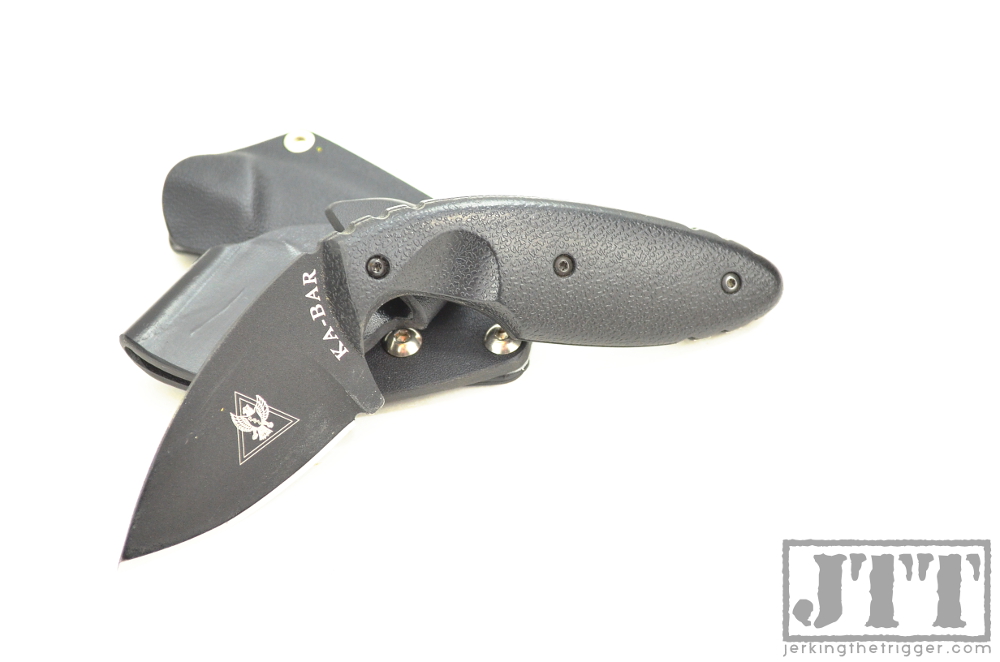
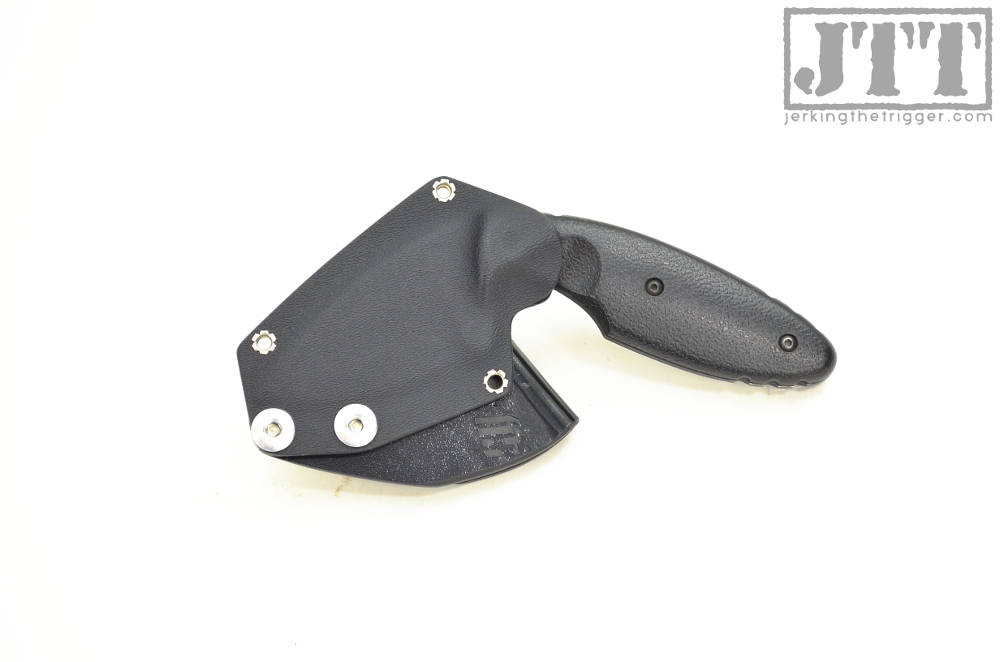
The FIN Designs Ka-Bar TDI sheath is designed to be carried inside the waist band. The sheath itself is a pancake design with small rivets that keep bulk to a minimum. The retention is set fairly aggressive. It does a great job of retaining the TDI. It provides excellent ease of access thanks to an aggressively dished out grip area which allows the wearer to bury their index (or pinky finger in reverse grip) deeply into the finger choil of the knife.

The belt clip is where most of the magic happens. The clip serves to both keep the sheath on your belt during the draw and keep the grip of the TDI tucked into your body for concealment. The clip is made from kydex and shaped so that it flairs widely to one side and the curls back to the middle of the sheath where it hooks under the belt. This creates a wing of sorts that uses your belt’s tension to pull the handle close to your body. The hook that grips the bottom is fairly long and has never failed to retain the sheath during my practice draw strokes even with a narrower belt than intended. It is an extremely clever and functional design that is also very easy to install or remove from your belt.

FIN Designs TDI Sheath Front FIN Designs TDI Sheath Back

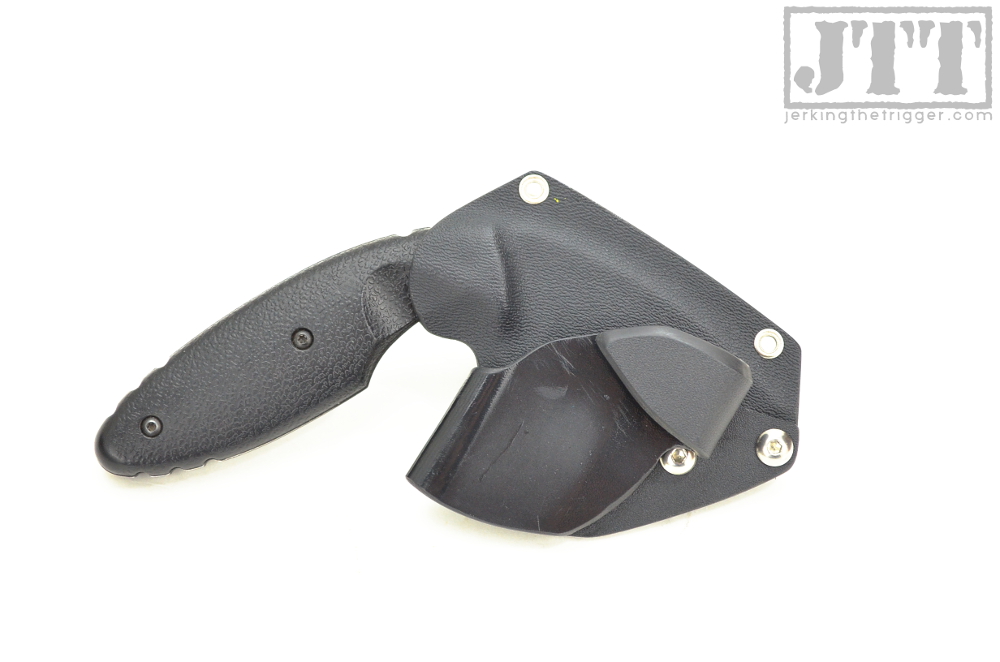
The fit and finish is good enough overall. There are no sharp edges, in fact great care has been taken to soften the edges. However, the edges are a little rough in spots. It does not affect function. The rivet work could be a bit cleaner as well but mine has held up well to daily use.

It is considerably more comfortable to wear than the original sheath. It has a very rounded profile that prevents hot spots well. I wear mine in the appendix position and mostly forget that it is there. The sheath also conceals very well. It basically completely disappears under a light shirt thanks to the clip design.

I am extremely pleased with this sheath. It is reasonably priced and very functional. The clip design is what makes the whole thing work and it certainly does work. Check out FIN Designs to see all the available options.

FIN Designs TDI Sheath with Belt FIN Designs TDI Sheath IWB

Review: V7 Weapon Systems QD Endplate and Lightweight Castle Nut

V7 Weapon systems is doing some fascinating things with some familiar AR-15 parts by making them from new materials. By using these new materials they are able to bring new functionality, mainly in the form of weight reduction, to parts you likely never give much thought – like your end plate and castle nut.

V7 Weapon Systems Combo Installed

Overview

The V7 QD Endplate and Lightweight Castle Nut are both made from an aluminum alloy. The V7 QD Endplate is made from hard anodized 7075-T6 aluminum which is the same alloy that true mil-spec receiver extensions are made from. The V7 Lightweight Castle Nut is made from an alloy that V7 Weapon Systems claims is 30% stronger and harder than 7075-T6. It is also hard anodized.

Together, the V7 QD Endplate and Lightweight Castle Nut weigh just .4 ounces. A standard end plate and castle nut weigh 1.10 ounces. The V7 QD Endplate and Lightweight Castle Nut together weigh less than just the standard end plate!

V7 Weapon Systems QD End Plate Back

Observations from Use

I installed the V7 QD Endplate and Lightweight Castle Nut on an already lightweight carbine and I think this is probably where they shine the most. Certainly, every ounce counts when you have to carry it over long distances but, realistically, you probably won’t notice the .7 ounce reduction in weight over the standard parts on an already heavy carbine. On a lightweight carbine, which already has parts chosen to reduce weight, these parts can help the overall weight reduction efforts.

The V7 QD Endplate seems to perform like any other end plate QD sling mount and that is a good thing because it weighs less than any I am aware of. I am generally more comfortable with steel QD sockets, especially at the rear attachment point since it takes so much of the load when the weapon is sling, but I have seen no appreciable wear in several range trips and I have used aluminum QD sling end plates before without issue. Like any good end plate, it can and should be staked and staking the aluminum is quite easy. I just use a center punch.

V7 Weapon Systems QD End Plate Front

I have no way of testing the claimed strength of the “super aluminum alloy” from which the V7 Lightweight Castle Nut is manufactured. The only thing that I could think to do was to mortar the carbine several times to simulate clearing a stuck case. I figured that was a realistic test that was likely to stress the junction of the receiver extension and the receiver. I mortared the carbine 10 times vigorously with no ill effects. I suspect that with any sot of realistic testing, the receiver extension is more likely to fail where it threads into the receiver than for the castle nut (regardless of material).

V7 Weapon Systems Lightweight Castle Nut

Wrap Up

The V7 QD Endplate isn’t earth shattering, there are other QD end plates, but it is functional and it is the lightest of its kind that I am aware of which gives it merit. The V7 Lightweight Castle Nut is more innovative. V7 Weapon Systems was able to identify the castle nut as a location to reduce weight with little to no durability penalty and, when this type of thinking is applied to the entire carbine, good things happen. Pick up the combo at V7 Weapon Systems.

V7 Weapons Systems is definitely company to watch. They are doing some very interesting and unique things right now.

Review: Geissele SD-C Trigger

The Geissele Automatics Super Dynamic series of triggers are some of the most visually distinctive triggers on the market due to their unique flat trigger bow. While it is striking, that flat trigger bow is not there for looks. It actually brings some interest functionality to an otherwise familiar trigger experience.

Geissele SD-C

Image courtesy of Brownells

The Geissele Automatics SD-C (Super Dynamic Combat) is basically a flat trigger bow version of the venerable SSA trigger. Like the SSA, it is a non-adjustable, 2-stage trigger with a 4.5 pound pull weight (2 pound first stage and 2.5 pound second stage). The second stage has the same “carrot like break” of the SSA as opposed to more glass rod break of Geissele’s enhanced triggers like the SSA-E or SD-E. The quality of the SD-C is typical of the previous Geissele products that I have used which is to say it is excellent.

My focus for this review of the SD-C was to determine what, if any advantages or disadvantages the flat trigger bow offers. I have a good baseline of experience with the SSA, G2S, and the S2S (now discontinued and replaced by the G2S) that I drew upon in making the comparison.

Geissele SDC Trigger Finger

The first thing that I noticed after installing the SD-C is that the flat trigger bow actually increased the trigger reach slightly but noticeably. Traditional curved triggers have a concave face that curls back toward the shooter at the center of the trigger bow. Obviously, a flat trigger bow lacks this curve which means that the center of the trigger bow is further from the back of grip and trigger reach is increased. I have averaged sized hands and this little bit of extra reach was perfect for promoting a proper, pad of the finger only, trigger engagement especially when using the large backstrap on a Magpul MIAD grip. The difference is enough to notice but probably not so much that users with small hands will have issues.

The flat trigger bow uses more than just a bit of extra reach to promote proper trigger finger placement. I have found that the flat trigger bow really just doesn’t feel right if you engage it with anything more than the pad of your finger. Curved triggers feel pretty natural for me with more trigger finger engagement – even up to the first knuckle. The flat trigger bow really feels unnatural if you give it any more engagement that just the pad of your finger.

Geissele SDC Installed Hammer

The most interesting part of using a flat trigger bow is how uniform the face of the trigger feels under your trigger finger. Curved triggers funnel your finger to the center of the trigger but this flat trigger bow allows you to place your finger anywhere on the trigger face from top to bottom. This allows you to place your finger lower on the trigger, which increases your leverage and can actually have the effect of making the trigger feel a bit lighter than it is.

I found that there was basically no ramp up time on the SD-C. I expected that I would have to spend some time getting used to it but I found in both dry fire and live fire that it felt intuitive right away. The fundamentals of good trigger control still apply and the SD-C works well to reinforce these fundamentals with the shooter by promoting proper finger placement, providing a lighter break, and a positive reset.

Geissele SDC Flat Bow

If I had to pin down a disadvantage to the flat trigger face, I would say that the uniform trigger face feel provides less reference in regard to your finger placement. Curved triggers basically funnel your finger to the same spot for every trigger engagement. The flat trigger bow will require more discipline on the shooter’s part to ensure consistent trigger finger placement.

I am extremely pleased with this trigger. I purchased it for use in a precision AR-15 build and it has been serving well in that role. I regret not purchasing the more refined SD-E trigger for this build but that is my fault, not the trigger’s fault. The fact that it is serving well speaks to the versatility of this trigger. It can really bridge the gap from self-defense to competition and from a general purpose carbine to a precision carbine.

Check out the SD-C at Geissele.com or pick up an SD-C for your build at Brownells.com.

Geissele SDC Installed Lower

Review: Manticore Arms Eclipse Flash Suppressor

Manticore Arms is known for offering muzzle devices that perform very well at very attractive prices. They first appeared on my radar when I was searching for a muzzle device for an AK with 24mm threads. At the time, Manticore Arms was one of the only outfits around that was making well thought out muzzle devices for 24mm thread and I still consider their offerings the best available.

Manticore Arms Eclipse Top Down

In recent years, Manticore Arms has rolled out products for various other rifles including the AR-15. One of their most recent offerings is a flash suppressor that they call the Eclipse.

The Eclipse is a forked or pronged style flash suppressor with 3 thick prongs. It weighs 3.6 ounces, the standard 22MM in diameter, and is 2.25” long (long enough to be pinned on a 14.5” barrel to bring its legal length to 16”). The Eclipse fits 1/2×28 threading and is specifically sized for .223 or 5.56mm projectiles or smaller. It is machined from 8620 steel and finished with Manticore Arms’ typical attractive black oxide finish.

Manticore Arms Eclipse Manticore Arms Eclipse 223

I tested the Eclipse flash suppressor with a mix of ammo that I had on hand which mostly consisted of Prvi Partisan 75gr .223 and Prvi Partisan 62gr .223. The Eclipse performed very well. There was no visible flash at the shooter’s position at any time. Observing the muzzle from the side would occasionally show a very faint, pencil thin, dull orange flash in front of the Eclipse that was barely visible and I mean BARELY visible. The performance of the Eclipse was on par or better than other pronged flash suppressors which is especially impressive given its price compared to most. It works very, very well.

Manticore Arms Eclipse Installed Front

I tested the Eclipse on two separate range trips. I wore electronic hearing protection on the first trip and ear plugs on the second trip. I did note some tuning fork-like ringing when I wore the electronic hearing protection (common to most pronged designs). It was duller and shorter in duration than other pronged flash suppressors that I have tried which is likely due to the thickness of the prongs. I didn’t note any ringing when wearing the ear plugs without the aid of electronic amplification.

The Eclipse is a solid performer at a great price. Check out the Eclipse Flash Suppressor at Manticore Arms.

Manticore Arms Eclipse Installed

Review: Aero Precision AR-15 Stripped Lower Receiver with Cerakote

Lower receivers are plentiful once again and there is no shortage of choices available to the potential AR-15 builder. There often isn’t much difference between lower receivers in terms of price and features so it is usually the little things that separate one brand from another. Aero Precision makes a great lower because they typically get those little things right.

Aero Precision Cerakote Lower Markings

Overview

The Aero Precision AR-15 Stripped Lower Receivers are machined from 7075-T6 forgings. They offer both standard hard anodized lowers and Cerakote lowers in both Desert and OD Green. The lower that I have been working with is their Desert Cerakote (FDE) model.

The lower features pictogram selector markings. It is marked “CAL MULTI” which is nice if you plan on using it for something other than a 5.56 build. Aero Precision also threads the take down detent hole which is a unique and handy feature.

Aero Precision Cerakote Lower Magwell

Observations from Use

The “fit and finish” is quite good which isn’t surprising coming from Aero Precision. They are known for clean machining. The interior of the magwell is smooth and clear of burrs. The front of the magwell has had all of the typical forging flashing machined away. The exterior lip of the magwell is also nicely rounded (some manufacturers leave this area too sharp). The inside of this lower is just as well finished at the exterior. I can’t find any flaws in the coating.

The threaded take down detent hole is a very cool feature. It allows you to use an easy to find 4-40 set screw to retain the take down pin detent and spring which makes installing your receiver extension quite a bit easier. if you don’t want to use this feature, you don’t have to and the screw is not included.

The magwell dimensions are spot on. I have Magpul PMAGs from around when they were first being produced and these earlier ones can be a tight fight in some receivers. They fit well in the Aero Precision lower. Every magazine type that I tried dropped free and fit well without excess wobble. I tested the lower with multiple generations of PMAGs including the new GEN M3 and MOE PMAGs, Tango Down Arc, NHTMG, Brownells, and D&H magazines.

Aero Precision Cerakote Lower Interior

I really appreciate the subtle markings that Aero Precision brands their receivers with. Markings obviously don’t affect performance but, all things being equal, I prefer a lower that has more restrained markings. I don’t really want clever selector markings or over the top roll marks. The understated “A” logo is more my speed.

Aero Precision hits all the right notes on these lowers except for one. Their magwell is not beveled near as much as it could be. It is the least beveled of any lower that I own. There is a small bevel and reloading still feels fairly smooth but it would be nice to have that little extra bit of forgiveness built into the magwell.

Aero Precision Cerakote Lower Pictogram Markings

Wrap Up

Thanks to its attention to detail, quality of coating, and understated markings, this is one of the cleanest looking lowers that I have seen. The threaded takedown pin detent hole is a well executed and handy touch. The only misfire is the relative lack of bevel on the magwell.

I especially like how reasonably priced these lowers are especially when you consider the Cerakote options. Check out Aero Precision when it is time to start your next build.

Aero Precision Cerakote Lower with Magpul FDE

Powered by WordPress. Designed by Woo Themes