Archive | Reviews

Review: LMT Defense Flip Up Sights

When you think LMT, you probably don’t think back up iron sights… That might change by the end of this review. I have been spending some quality time with a set of AR-15 back up sights with a very straight forward name – the LMT Defense Flip Up Sights. At first glance, you might see some influence from other sights on the market but when you drill down a bit you see some unique features that make these worthy of your consideration.

LMT Defense Flip Up Sight Front Top LMT Defense Flip Up Sight Folded

Overview

This review will cover the L8BUI556 sight set which consists of the L8N 5.56 Flip Up Rear Sight and the L8K Flip Up Front Sight. They can be purchased separately or as a set.

Both the front and rear sights feature steel construction with a black phosphate finish. They weigh in at 4.4 ounces for the set. The sights do not lock in the up or down position. They have a strong and positive detent that keeps them upright until you decide to fold them (or down until you need to deploy them). Both sights mount via a large cross bolt that can be turned with a flat head screwdriver or an improvised facsimile.

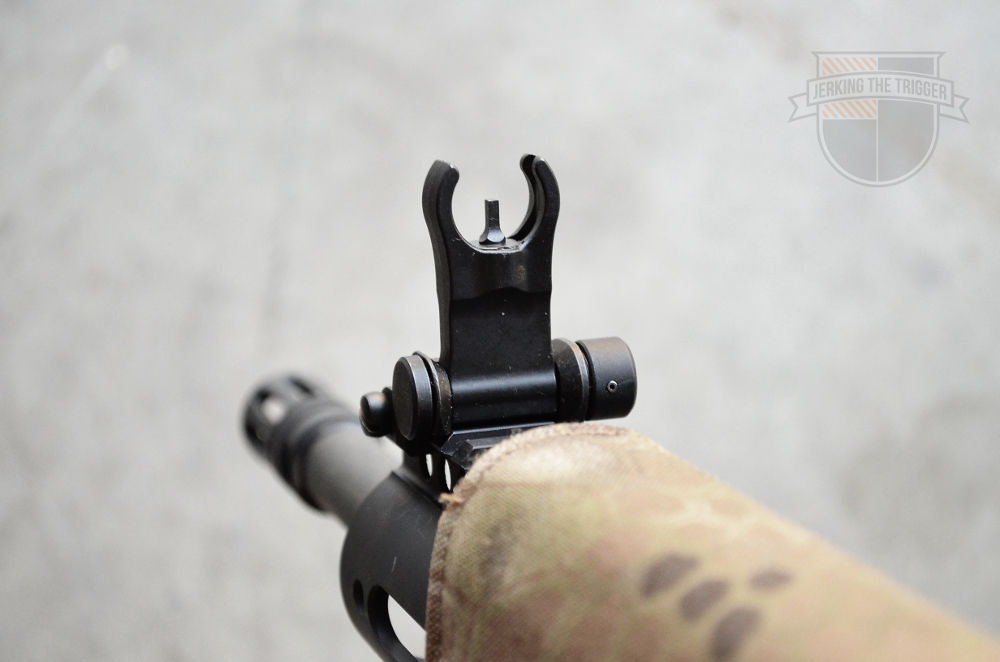
The front sight features large ring shaped protective ears. LMT managed to cram a standard AR-15 front sight post into the relatively compact design.

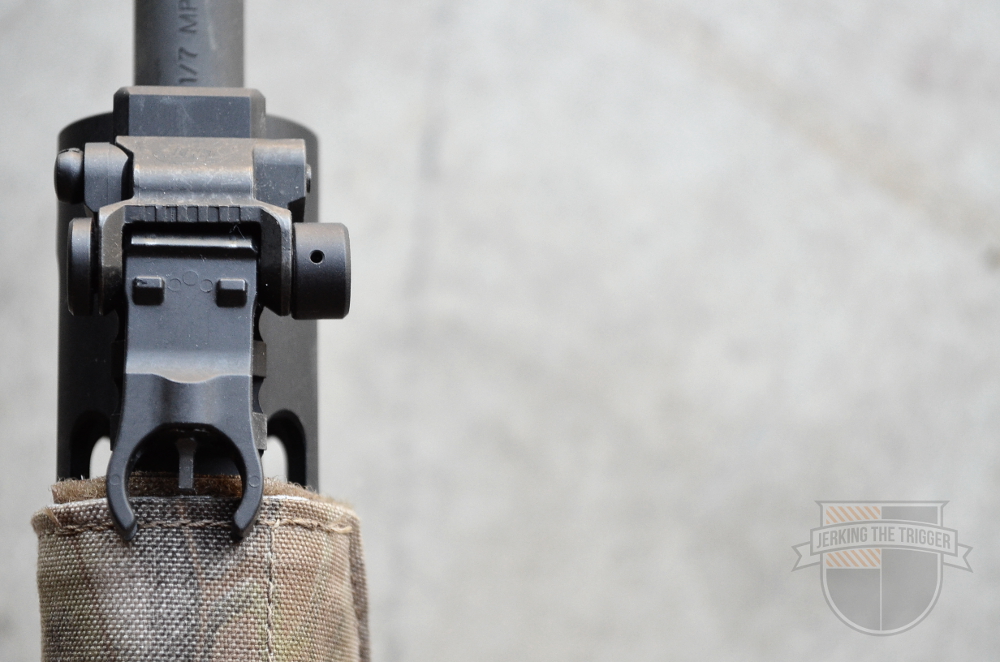
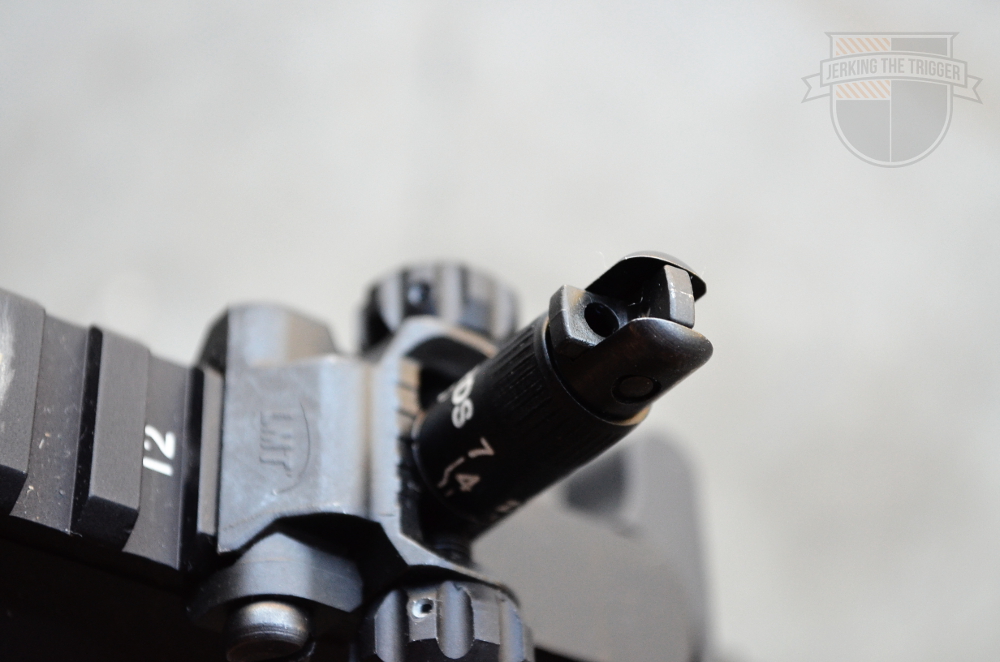
The rear sight has a BDC cylinder that is marked in increments of 100 yards out to 700 yards. Elevation adjustments are made at the front sight as normal but bullet drop can be compensated by twisting the cylinder in the desire direction. Each click of the BDC cylinder is a 1/2 MOA elevation adjustment. The windage adjustment is accomplished via knobs on either side of the sight and offers 1/4 MOA increments.

The rear sight features two, same-plane apertures which can be easily selected by the shooter. The sight can be folded with either aperture in the deployed position. The smaller one measures .0625″ in diameter and the larger measures .125″ in diameter.

LMT Defense Flip Up Sight Front

Observations from Use

These sights are easy to install and zero. They have a Z (zero) setting on the BDC cylinder which I did not use. I just set the cylinder to the 200 yard mark, zeroed at 50, and then confirmed that I was zeroed at 100 yards on the 100 yard setting. I generally just keep the BDC cylinder set at 200 yards for everything from arms length to 200 yards just for consistency sake with my other ARs that have 50/200 yard zeros.

The dual windage knobs on the rear sight made zeroing just a little bit easier. While zeroing, I was laying in the prone position with the muzzle resting on a backpack. The left side knob allowed me to reach back with my support hand to make adjustments. If you are unsupported, you can still use your strong hand like you would on most sights. I suspect that my southpaw friends will appreciate the ambidextrous knobs as well. I do wish they were smaller to avoid getting knocked off zero. I didn’t have a problem but smaller knobs might keep Murphy at bay, especially since these knobs are basically used to zero and then never touched again.

The BDC cylinder is easy to read and easy to use. It is plainly marked from 100 to 700 yards. The cylinder bottoms out on the 100 yard mark which serves as a sort of zero-stop. One full rotation puts you on the 600 yard mark with the 700 yard mark coming about a half turn after that. This means that the 700 yard mark is located between the 400 and 500 yard marks on the cylinder and the shooter needs to give a full rotation before settling on the 700 yard mark (not that these sights will be used often at 700 yards on an AR-15 carbine). There are 10 additional clicks after the 700 yard mark before the BDC cylinder hits a hard stop which is nice because it makes it hard to get lost when you are dialing distance.

LMT Defense Flip Up Sight Front Folded

The apertures on the rear sight have it going on. They are same-plane which is a big plus in my book. You can keep either aperture in the ready position and still fold the sight normally. The smaller aperture is fairly standard in size and provides very fine aiming. The larger aperture is actually smaller than most rear sights. It is large enough to provide some additional light and speed but still small enough to be used as slightly extended distances. I suspect that it’s smaller size is dictated by the form factor of the sight but it works.

I am glad to see that these sights use only a detent to stay in position rather than a positive lock. In my experience, this makes sights much better equipped to handle impact. Every rail mounted fixed sight or locking sight that I have drop tested will bend or break, often on the first drop. Typically, those that use only detent action to stay in place survive repeated drops because they can collapse on impact. That was the case with the LMT Flip Up Sights. I dropped them 3 times from waist height with no physical damage other than scratching.

The front sight has a lot going for it. I was thrilled to see that it uses a standard front sight post. That may seem like a small thing but it actually one of the features that really sets these sights apart. By shoehorning a standard front sight post into a relatively compact front sight LMT has given you a ton of options like tritium front sight posts, finer front sight posts, and the ability to use common front sight adjustment tools.

I would prefer to see the standard, outward curving front sight protection ears but that is just personal preference. I know that some people find the round ears to be faster since you basically look through the sight and place the entire round front sight assembly on your target to get a quick hit up close. However, I find that sometimes my eye wants to center the round protective ears rather than the front sight post during slow fire.

LMT Defense Flip Up Sight Rear

It is obvious that LMT took great care to remove sharp edges from these sights. Even the top of the rear sight apertures is blended into its dome shaped protective ears to make the whole structure as blunt as possible. The lack of sharp edges and break away action of the sights are all part of the original design requirements to create sights that were as safe as possible to the shooter.

These aren’t the smallest or lightest sights on the market but they should be pretty darn durable. Like I said, they came through 3 drops basically unscathed and the all-steel construction should make them plenty rugged.

Wrap Up

These LMT Defense Flip Up Sights may have a mundane name but they pack of lot of slick features. The windage knobs should be reduced in size and I would prefer outward curving protective ears on the front sight. The rear sight is very well designed with its same-plane apertures, ability to fold with either aperture in the ready position, and dual windage knobs. The use of a standard front sight post give the end user tons of options. These sights are definitely worth a look for your next build.

Check out the Flip Up Sights at LMT Defense.

Disclosure: These sights were provided to me for review, free of charge, by LMT Defense.

Challenge Accepted! Lightweight on a Budget Build

After I completed my Sub 6 with a Twist build, I received an email from a someone who stated that anyone could make a lightweight rifle if they had “unlimited funds like you”. This gentleman obviously doesn’t have access to my bank statement but I took that email as a personal challenge to prove him wrong.

SUB_6_With_a_Twist

The mildly infamous Sub 6 with a Twist Build

My goal was to build a good quality, reliable carbine that weighed around 6 pounds and cost around $1200. I acknowledge that $1200 is a lot of money but it is still less than some stripped-down, off-the-shelf carbines. The plan for this one was going to be far more ambitious than just iron sights and plastic hand guards. In order to prove this guy wrong, this project would have to have a 12″+ hand guard, a weapon light, and a quality optic. To really prove him wrong, every part would have to be scrutinized for cost in dollars, cost in weight, and quality so that not only was this build affordable, it was also functional.

I am proud to say, I nailed the weight and came in just over $1200 on the price. However, the prices are all listed at retail. A savvy shopper could easily bring the price below $1200.

The Build

I’ll start with the lower as it is an easy one that can be knocked out at one vendor and then move on to the upper parts which requires more thought. Finally, I’ll wrap up with the accessories that make this into an exceedingly useable carbine.

Lower Build

The obvious choice for the lower was a GWACS Armory CAV-15 MKII. Their one piece polymer lowers are extremely durable, very lightweight, and economical considering that they include the pistol grip and buttstock. I have used them extensively and have come to trust them. The lower itself costs $129 and the lower parts kit adds $64.95. If you can find a few extra dollars in your budget, GWACS Armory’s new lightweight pivot pins will save you even more weight.

Upper Build

The upper receiver is where much of what makes an AR-15 reliable happens. This is perhaps the most delicate balancing act between cost in dollars, cost in weight, and quality. Fortunately, we live in a bit of a golden age for the AR-15 and there are no shortage of choices.

The barrel was an easy choice. Faxon Firearms makes great AR-15 barrels that are VERY affordable. I have one of their 16″ midlength, lightweight 4150 barrels that has been a real performer for me. For this build, I used a 16″ midlength, lightweight profile 416R stainless barrel with QPQ finish which has been an impressive performer and will be the subject of a full review later. It is accurate, lightweight, very reliable, and at just $189 – a perfect choice for this build. If you want to save even more, use the 4150 version of this barrel at just $175 (less if you shop around).

This Faxon Firearms barrel was critical to this build. Much of the weight (barrel profile) and reliability (gas port, chamber, etc.) of your build will come down to barrel choice. It would be more difficult to hit the weight and budget numbers, while still building a reliable carbine, without their barrels.

While I was perusing Faxon Firearms, I also picked up their gas block and gas tube. Buying these with the barrel saves $5 ($29.99 for the gas block and $15.99 for the gas tube). Faxon Firearms’ gas block also happens to be skeletonized which saves weight.

I picked up a blemished stripped upper from Aero Precision. I use Aero Precision’s upper receivers in many of my builds and have come to trust them. Their blem uppers also happen to be a great deal. Watch for sales and shop around for an even better price than the $49.99 reflected in the final price for this article. If you are anything like me, you have a forward assist and dust cover laying around.

1200 Lightweight

Here it is. You can cram a lot of carbine into $1200 and 6 pounds.

It isn’t hard to find bolt carrier groups for around $140. Pick up the one you are most comfortable with and run with it. In that price range, I really like the Sionics Weapons Systems NP3 coated BCG. Add the charging handle of your choice. You should be able to find a plain one for around $15 if you shop around.

When you think of lightweight and affordable rails, you think of the ALG Defense EMR. It isn’t just a decent cheap rail. It is one of my favorite rails regardless of price. I chose the 12″ EMR V0 since it comes with all the rail sections I would need later in the build, costs only $135, and weighs in at a scant 7.84 ounces including the barrel nut!

The ALG Defense EMRs also have integral sling swivel sockets which saves weight and cost. This is often overlooked but should be considered when planning a lightweight/budget build. The EMR V0 comes with a barrel nut, rail sections, and integral sling mounts. It is a good deal on its face but it is mind blowing deal when you consider the cost of those items.

Accessories

The accessories are what round out this build and make it really impressive for the cost. You can spend more than $1200 for a basic AR-15. If you follow this recipe, that same $1200 builds you an AR-15 with 12″+ hand guard, a weapon light, and a quality optic.

I chose an INFORCE WML for the weapon light. It weighs 3 ounces and has in integral mount which makes its $125 price tag seem even more reasonable. You could go cheaper on the light but it will difficult to find a set up this light in weight.

Magpul’s MBUS back up iron sights are an easy choice for this build. They are affordable and lightweight. A set can be purchased for around $80 (less if you shop around, especially on the secondary market).

The optic that I chose weighs around 6 ounces with its ADM QD mount, has 50,000 hour battery life, rugged construction, has a variety of mounts available, and uses a common CR2032 battery. Sounds expensive, right? It is also backed by some of the best customer service in the business yet it costs only $238.99 (with an ADM mount so it could cost even less with a less expensive mount). The Primary Arms MD-ADS has impressive specs and has proven itself to me as a solid value.

I just used an A2 flash suppressor that I had laying around. If you don’t have one, ask a buddy.

The Tally

The total weight of the carbine build listed above worked out to 6 pounds even. I was hoping to go under 6 pounds but I am glad I didn’t go over.

The total cost was $1219 going by mostly normal retail prices. Like I said before, a savvy shopper could easily build this for less than $1200.

Wrap Up

This build made me realize how blessed we are as shooters/consumers. A build like this wouldn’t have even been possible just a few years ago. Rails were much heavier, barrels were more costly, weapon lights were massive, lightweight optics were more costly, and there certainly weren’t as many choices.

Expensive AR-15s are often expensive for a reason but, in this golden age of AR-15s, you should never feel like you have to settle. There are enough options out there that anyone should be able to build something close to what they want at a price they can afford if they are willing to do some leg work.

Review: Snake Eater Tactical War Belt

The Snake Eater Tactical War Belt (SET War Belt) doesn’t look much like most “war belts” and as far as I can tell after spending several months with it… that’s a good thing.

SET War Belt

Overview

The SET War Belt consists of three separate components that can be mixed and matched. Some of them can even be used as stand-alone items. Those items are an inner belt, a belt pad, and the outer “duty” style belt.

The inner belt is made from 1.75″ wide hypalon with loop Velcro sewn over its entire outer surface. It features a unique fold over Velcro closure. It can accept the belt pad or the duty belt directly if you do not wish to use the belt pad.

The belt pad is made from 4mm closed cell foam encased in heavy duty mesh. This makes the pad extremely thin and relatively lightweight. It has Velcro sewn to both sides so that it can be sandwiched between the inner and outer belt.

SET War Belt Parts

The 1.75″ outer belt is made similarly to Snake Eater Tactical’s EDC/gun belts. It has two layers of webbing sewn together and is closed with a Cobra buckle. It is not as stiff as scuba webbing belts but offers more than enough structure to use with holsters and subloads. The inside of the belt is lined with hook Velcro which is sewn at intervals to create a MOLLE like structure for attaching gear to the belt to ensure it stays where you want it. This belt also makes a very good stand alone gun belt as long as your holster loops can accommodate the slight extra thickness from the Velcro lining.

Observations from Use

All three parts of the SET War Belt are solid. The inner belt and belt pad in particular are the best of anything similar that I have ever tried.

The inner belt benefits greatly from the properties of the hypalon material from which it is made. It is extremely thin, light weight, and its rubbery texture helps prevent the belt from moving. The fold over closure is very clever. It provides a secure closure so you can really synch the belt without fear of slipping and it is much thinner and more flexible than a buckle. This means it won’t create a hot spot after several hours of wearing it under a weight bearing belt. It is very, very clever and it is no wonder that Snake Eater Tactical now offers it for purchase separately.

The belt pad is equally as excellent. It is very thin compared to many belt pads but it offers more than enough padding to prevent the hotspots created when a stiff, weight bearing belt is pressed into your hips for a few hours. It breathes well. It is flexible enough to stay out of your way when you do things like drop into squatting shooting positions. I keep trying to convince them to offer the belt pad for purchase separately since it would work with many inner/outer belt combos. I think they would (or should) sell a million of them.

SET War Belt MOLLE SET War Belt Sub Load

The out duty belt component will be very familiar to those who have tried Snake Eater Tactical’s excellent riggers belts. It is stiff enough to handle anything you want to mount on it without buckling and yet still more flexible than most duty belts.

The duty belt’s inside lining of hook Velcro locks it to the inner belt or belt pad. The lining is sewn at regular intervals which create channels that can be used to trap MOLLE accessories that are hung on the belt so that they do not move around on the belt. The channels are wide enough to accept the vertical strap of a subload or drop holster. Belt mounted accessories can be threaded on as normal. It is a very flexible system.

I should also note that this belt works extremely well with Snake Eater Tactical’s excellent Burro Magazine Pouches. They are ideal for belt use and make an already versatile belt, even more versatile since they will tenaciously hold just about anything. As an example, the Burros sized for AR-15 magazines will hold a Bic pen tight enough that you can turn it upside down and shake without losing the pen. In spite of the retention, you can still easily insert and remove magazines. It all works because of a symbiotic relationship between hypalon, curved Kydex tensioners, and heavy duty elastic.

The quality and durability of this belt are top notch. There is plenty of stitching to reinforce stress points. The materials are all top notch. The workmanship is typical of Snake Eater Tactical which is to say it is very good. It is just solid.

SET War Belt Buckle

Wrap Up

While the concept of inner/outer belts with pads is not new, the SET War Belt feels like a new idea. The inner belt is original and innovative in how it leverages smart design and new materials to make it better. The pad uses thinner padding and mesh to make something more comfortable than you would bet it could be. The duty belt offers the typical quality you have come to expect from Snake Eater Tactical belts. Together, they all work to create a flexible and very functional piece of gear.

The SET War Belt has replaced my bulkier, padded belt set up. It is more trim, more comfortable, and it stays in place better. This is a great piece of gear that I highly recommend.

Disclosure: The SET War Belt was provided to me by Snake Eater Tactical for review, free of charge.


Review: Scalarworks LDM

The Scalarworks LDM is an ambitious product. It is a quick detach Aimpoint Micro Mount that features a unique locking system and a radically skeletonized design. The result is a quick detach mount that weighs within a few tenths of ounce of the lightest non-QD mounts on the market.

Scalarworks LDM 3

The LDM or Low Drag Mount is designed from the ground up to be light weight. Traditional throw lever style QD mounts are heavier due to the presence of the lever which must be large enough to be operated by hand. In order to make a truly lightweight QD mount, Scalarworks had to get away from the typical throw lever. They designed a ratcheting thumb wheel that is extremely compact and thin enough that it fits within the footprint of the mount itself yet is easier to operate than a really tight throw lever.

The thumb wheel has a deeply knurled surface that mates with a detent in the mount. This makes setting consistent tension on the mount a snap since you can witness-mark the particular groove that the detent should lock into and be sure to tighten to the mark every time you reinstall the mount. This locking system is pretty ingenious and has certainly held up just fine to my testing.

I tested the return to zero capability of the mount by firing four separate three shot groups at 50 yards, removing the mount between each group. I could detect no difference from group to group with each one stacking on top of the other. Admittedly, it would have been easier to spot a difference at a greater distance and with a more precise optic. For my purposes, the 50 yard test was sufficient for a red dot sight.

The mount itself has been machined to a bare minimum of material. Some of you are going to look at it and think it will break or bend easily. However, I dropped my carbine from chest height directly onto the optic with no ill effects other than some dings on the optic. When you have the mount in hand, you can see that the pillars that support that optic are actually more robust than you would think from the pictures. Can this mount be bent more easily than a heavier, non-skeletonized mount? Probably, but it will take some abuse to do it.

Scalarworks LDM

I should also point out that Scalarworks didn’t skimp on the clamping surface. The rail clamp runs the entire length of the side of the mount. Once the thumb wheel is turned to hand tight, the mount isn’t moving.

I have the LDM110 which is the lower third co-witness model. I use it on a carbine that I purposely built to be extremely lightweight. At 1.37 ounces, it weighs less than half of the mount that it replaced on this build! To save that much weight on such a small part is amazing. It was an integral part of my Sub 6 with a Twist Build.

The LDM seems to be extremely well made. The machine work is clean and the finish is even. The fit and finish on my example is excellent.

Wrap Up

The LDM is the lightest Aimpoint Micro QD mount on the market by a wide margin. Heck, it is lighter than most non-QD mounts. It is well made, it mounts easily, it returns to zero at least as well as is required for the precision level of the optic it mounts, and it looks pretty darn good too. This is an impressive mount and I can’t wait to see how they adapt this design to support other optics.

Disclosure: The LDM was provided to me by Scalarworks for review, free of charge.

Set Up Your RDS Magnifier for Success

It wasn’t long after Aimpoint released their 3X Magnifier that I had one in hand. I basically waited to purchase mine just long enough for LaRue Tactical to come out with their LT755 QD Pivot Mount. Since that time, the magnifier concept has lost some of its cache likely due to the improved low power variable magnification optics that proliferate now and a better understanding of some of the shortcomings that are inherent to RDS magnifiers. Those shortcomings include narrow field of view (which isn’t that bad), significant extra weight, increased distortion of some red dot sights, and a clumsy transition between mounted and unmounted.

There were times in the last several years where I was tempted to sell my magnifier but I could never quite bring myself to do it mostly because, in spite of its flaws, it still does something that no other optic set up can. It offers useable magnification along side true non-magnified performance. As good as 1-4X and 1-6X optics have become, there is still a difference between the 1X setting of these low magnification variables and a quality RDS (see this previous article).

Now that I have literally years behind an RDS and magnifier setup, I have found that there are really three keys to making them work for me. That means there are three keys to mitigating the main drawbacks of the concept and all three are pretty simple.

JTT-Magnifier-Carbine

Choose a Good Mount

The mount is probably the single most important factor in ensuring that you have a good magnifier experience. I dislike mounts that require the magnifier be removed from the rifle in order to use the RDS by itself. I don’t want to have to worry about stowing my magnifier on my gear.

Choose a mount that allows you to quickly move the magnifier out of your field of view while keeping it attached to the rifle or remove it all together. I like the LaRue Tactical LT755 but there are other choices.

Choose the Right RDS

I use Aimpoints almost exclusively on my carbines and as much as I love them, I admit that not all of them work well (for me) in front of a magnifier. I first used the magnifier behind an Aimpoint Comp ML3 with a 2 MOA dot reasoning that the finer aiming point would be beneficial and it worked well for me but I saw some distortion of the red dot. I later tried it behind several Aimpoint Micros and Comp M4s but found that the dot turned into a series of star bursts or several dots swimming around each other when magnified. This may not happen for all users but it happened for me.

It turns out that the best combination that I have found so far is a Comp ML3 with the 4MOA dot. For whatever reason, I see Aimpoint’s 4 MOA dots much more clearly. This combination gives me a razor sharp aiming point and makes hits out to 300 yards very easy which is really all I can ask from this set up.

Whichever RDS you prefer, spend some time figuring out what works best in front of the magnifier.

Shed Weight from the Front of Your Carbine

Using an RDS and magnifier set up means having two optics and two mounts on your rifle. The capability that this setup offers comes at a fairly steep cost in weight. The best way I have found to mitigate this is the shed weight from your carbine, concentrating specifically on the front end.

The weight of the magnifier sits toward the rear of the receiver. You can really counteract the heavy overall feeling that this lends a carbine by reducing weight at the front. Choose a lighter barrel profile and a lighter hand guard. I think that in order to get the most out of a RDS and magnifier setup, you really need to build the carbine with this setup in mind.

You don’t have to go crazy. A lighter medium profile or pencil barrel and lightweight extended hand guard will make a big difference in how your carbine feels. It will also greatly reduce the overall weight. You should be able to build a carbine that weighs around 7-7.5 pounds (and feels lighter because of where the weight is) without much trouble at all.

If you have a magnifier and are thinking of giving up on it, gives these three tips a try before you boot it to the curb. If you are thinking of trying a magnifier, make sure to set yourself up for success. There really is a strong upside to this set up but it takes a little fore thought to get the most out of it.

Powered by WordPress. Designed by Woo Themes