Archive | Reviews

Adding a Weapon Light to a 10/22 the Easy Way

There are plenty of ways you can add a weapon light to a Ruger 10/22 and plenty of reasons you might consider doing so. In my case, I wanted to be able to illuminate critters who might be getting into the garden or hen house.

I posted a picture on Instagram yesterday of one of my 10/22s with a Streamlight TLR-1 attached in such a way that it could easily be activated with the index finger of the support hand. Someone asked which mount I was using and at the time I couldn’t remember so I checked around online to find out. The mount in question is the Pro Mag Tactical Barrel Band.

There aren’t many Pro Mag products I can recommend but the Tactical Barrel Band has worked out for me very well for more than 5 years. It easily replaces the OEM barrel band found on many 10/22 variants and provides a side rail, bottom rail, and fixed sling loop. You can flip it so that the rail and sling loop are on either side and it is machined from aluminum.

I have come to like this mount quite a bit. It’s easy to install, provides a useful front sling mount, and places the light in such a way that it is easy to active both momentary and constant modes. I would prefer that the side rail was a bit longer but the adjustable clamp style mount found on the TLR-1 attaches securely.

ProMag Tactical Barrel Band

Review: Outdoor Research Sun Runner Cap

I’ve always liked Outdoor Research’s caps and I’ve owned a number of them over the years. The Sun Runner Cap in particular stands out as my favorite. It just works for me and the things I do outdoors better than any other cap I’ve tried.

Overview

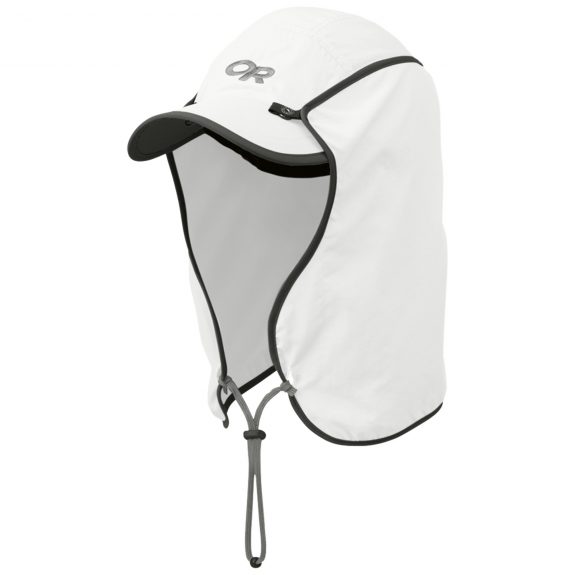
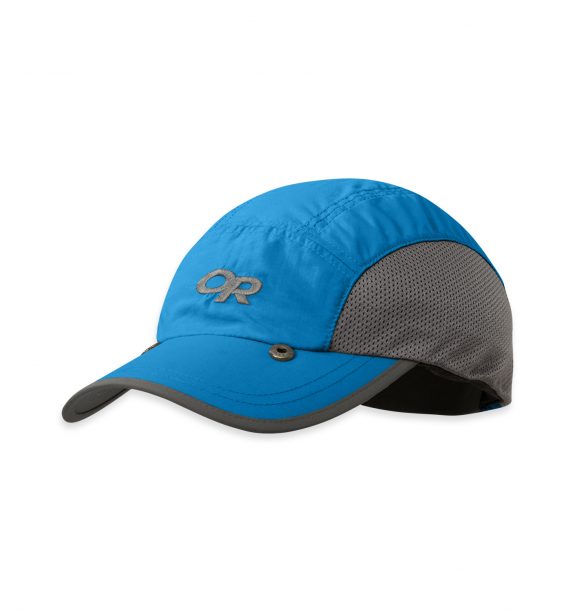
The Sun Runner Cap is, as the name implies, designed to keep the sun off its wearer. The cap itself has 6 panel construction which is very comfortable to wear. The large panels on either side of the had are made from mesh while the top and front panels are made from the same thin Supplex nylon that OR uses in many of their caps.

The stiffened and preshaped brim is shorter and rounder than a typical ball cap. It also features two snaps that allow the Sun Runner to mount the included cap which is also made out of Supplex nylon.

Observations from Use

One of the biggest reasons I like this cap is the fit. OR offers the Sun Runner in 4 different sizes: S, M, L, and XL. I have a big head and finding caps that fit well can be a challenge. The Sun Runner offers plenty of adjustment. The fit is perfect and even comes down low on my head (below the tops of my ears) which is rare for me.

This hat also breathes and wicks perspiration extremely well. I own the hat in White and Hydro (Blue). The White one in particular feels cooler than my uncovered head! It reflects the sun’s heat and the side panels allow the hat to breath so that you actually get some evaporative cooling action from the hat band. Speaking of the hat band, it does a great job of keeping sweat out of your eyes.

The Sun Runner also does a great job of dealing with the sun – especially for shooters. The underside of the brim is a very dark grey that cuts down on glare which is nice when your eye is buried in an optic and your trying to pick out a distance target. OR purposely uses a dark color under the brim on all the Sun Runner colorways. The included cape drapes down and covers the back of your neck even when you drop into the prone which is a godsend if you are in a precision rifle class and spending a lot time in the prone. If you find that the cape is interfering with your cheek weld, just flip the removeable chin cord back behind your neck and tighten it slightly. This will keep the sides of the cape back and away from your face while still providing full neck coverage.

I should also note that this cap lacks a “button” on the crown like those found on ball caps. It also fits very close to the head which makes it very comfortable to wear with over the ear hearing protection. You can even attach the cap over your ear muffs with a little work but I usually just let my ear muffs hold the cape back or use inside the ear hearing protection.

I also use the cap extensively for hiking. It’s relatively lightweight at around 3 ounces (less if you don’t need the cape). It is very packable thanks to the compact brim and unstructured top. It even fits in most pants pockets though a cargo pocket works best. It’s a great three season cap in my area where we deal with lots of sun and heat in late spring through early fall.

Wrap Up

I like the Sun Runner Cap so much that I bought two of them. It deals with sun, heat, and sweat better than any other cap I’ve owned. It’s perfect for a carbine class, hiking, and working outside. If all that isn’t enough, you feel like Lawrence of Arabia when you wear it with the cape attached and that is worth something.

I bought one of my hats locally but I got a much better deal on the second one by purchasing it online at Amazon. OR occasionally discontinues certain colors which usually results in deep discounts so keep an eye out for that. OR Sun Runner Cap on Amazon

EZ Accuracy GBDT (Gas Block Dimple Tool)

Dimpling an AR-15 barrel serves a couple of important purposes. It indexes the gas block to ensure that the gas block aligns with the barrel’s gas port. It also serves as a detent that prevents the gas block from spinning if it is impacted. In spite of this, most AR-15 manufacturers that offer low profile gas blocks, still do not dimple their barrels. Now, it’s easier than ever to do it yourself.

I recently received a GBDT or Gas Block Dimple Tool from EZ Accuracy in a TacPack. Since that time, I’ve used it to dimple 5 gas blocks and I’ve purchased two more of them to give as gifts. I am thrilled with the GBDT and think it makes a great addition to any AR-15 owner’s work bench.

The GBDT is simple – I mean really, really simple – and that is what is best about it. It comes with two parts: a 10-32 hollow screw and a tiny center punch. You can pretty much figure out how to use it by looking at it but is also comes with simple instructions.

To dimple your barrel, you simple remove one the set screws from your gas block. There are usually at least two set screws in a low profile gas block. You should leave the others in place so that the gas block can not move. Replace the removed set screw with the included hollow screw and hand tighten. Place the included center punch in the hollow screw with the pointed end toward the barrel. Give it a tap with a hammer to center punch the barrel (prevents the drill bit from walking in the next steps). Remove the center punch and replace with a sharp 1/8″ drill bit. Drill only slightly into the barrel. You’re done. It takes less than 5 minutes.

The dimple doesn’t need to be deep to work so be conservative with your depth. Drill bits are cheap – use a fresh one. One dimple per gas block is typically enough. I prefer to dimple under the set screw closest to the receiver as this one is typically in the same location on many gas blocks.

The EZ Accuracy GBDT is $16 well spent.

Check it out: EZ Accuracy GBDT

Review: TacPack July 2017

The July 2017 TacPack has arrived at JTT HQ. I’m just going to say this up front. This is the best one yet. It is full from top to bottom and front to back with stuff I will use. Let’s look inside.

Hopefully you are familiar with the concept of TacPack by now. If not, you can read the reviews of the previous TacPacks for some background on this subscription box.

BreakThrough Clean Kit – I don’t really spend a lot of time cleaning guns but everyone has to grudgingly clean once in a while (I’ll never understand you weirdos who like cleaning guns). If you have a gun, you can use this. It comes with solvent, oil, 2 packets of grease, a doubled ended nylon AP brush, and a microfiber towel (which will change your life if you haven’t used one before). I’ve generally been happy with BreakThrough clean products and I especially like that they are pretty much odorless. This is a useful addition.

EZ Accuracy Gas Block Dimple Tool – Most AR-15 manufacturers offer low profile gas blocks as an option but the majority of them still don’t dimple the barrel as a reference for gas block alignment. This product solves that problem. You back out one screw in your gas block and replace it with the special hollow screw provided in this kit which allows you to center punch the spot to be dimpled with the included punch. The hollow screw then acts as a guide for a 1/8″ drill bit so you can quickly and easily dimple your barrel to ensure that the gas block goes back on in the exact same place should you ever need to remove it. You won’t use this every day but you’ll be glad you have it.

Fusion Climbing Runner/Sling and Locking Carabiner – The hits keep coming with this box! I don’t climb but everyone knows you can use a carabiner in about a million ways. I use them all the time in rigging for all the wood cutting I do. The included steel screw gate carabiner will be put to use right away. If you don’t climb, you may be less familiar with runners (or some people call them slings). They are basically really strong loops used for all kinds of things in climbing. I use them to girth hitch things like snatch blocks/pulleys to trees for redirecting pulls with the come-along winch I use when wood cutting. You can find all kinds of uses for items like these from tying into your tree stand to hanging a bear bag on your next overnighter.

5.11 Tactical Wharn Knife – The 5.11 Tactical value knives are actually solid little knives for the price. Knife nerds won’t get off on the AUS 8 blade steel but knife users know it as a fine grained steel that takes a refined edge easily. The ergonomics on this Mike Vellkamp design will take you by surprise. The blade moves VERY smoothly and it locks up well. This is probably the best knife to find its way into a TacPack yet.

MOAB Patch – And you thought MOAB stood for Mother of All Bombs… Nah. It’s Mother of All Bottlerockets!

I rate these boxes on the basis of whether or not I will actually use the included items. With that in mind, this is easily the best box to date. Everyone reading this right now needs gun cleaning items. Even if you don’t know it yet, carabiners and runners/slings are really handy. You can easily find room in a kit for a knife like this and I never would have known about the EZ Accuracy GBDT if it weren’t for TacPack. It is boxes like these that keep me talking about TacPack.

If you want to try TacPack, you can check them out at TacPack.com. TacPack hints that the August box will contain some Mission First Tactical gear.


Disclosure: I receive this subscription box from TacPack, free of charge, for review.

Sawyer Squeeze and Mini Water Filters

When it comes to outdoor equipment (or really anything) the best is rarely cheap. That is exactly what makes the Sawyer Squeeze and Mini Water Filters standout. They are the best trail filters that I have used and they are also the cheapest. That is a tough combination to beat.

Sawyer Squeeze PointOne

I’ve owned a Sawyer Squeeze since before 2013 when they updated the model to include some new fittings and redesigned bags (much needed, the original bags don’t hold up well). That little filter has produced a lot of clean drinking water in that time and it has earned a permanent place in my hiking pack. I have had the Sawyer Mini for much less time but it is equally easy to use, has more versatile connections, is smaller, weighs less, and costs even less (I’ll compare the two later in this article).

Sawyer Mini

Rather than go on and on about these filters, I’ll lay out what I like about both of them. Then, I’ll address them each individually.

What I like about both filters:

  • Compact and lightweight – The Squeeze weighs in at 3 ounces and the Mini at 2 ounces. Both are considerably smaller than any of my previous filters. They are small and light enough to live in my pack – even if I am just on a day hike and carrying all the water I will need.
  • Affordable – These cost between $20-30 for the basic packages. That is less than 1/4″ the cost of my previous ceramic trail filter. The entire filter with bag(s) cost less than just the replacement filters my old system.
  • Durable – These are made from plastic with no ceramic elements. They can take a beating.
  • Reliable Filtering – Both filters boast an absolute .1 micron rating. They get the nasties out.
  • Easy to Use – There is no pumping, no inlet hose to clean, no ceramic filters to clean, and no fuss. Squeeze dirty water through and drinkable water comes out. It’s easy.
  • Versatile – These work with the provided bags but they also thread right onto standard 20 ounce and 2 liter bottles. They can be set up as inline filters on your hydration bladder or as gravity filters on something like an MSR Dromedary Bag.

What I like about the Squeeze:

  • The Squeeze filter has more filter media than the Mini so it is slightly easier to drink from. If you plan to use the simplest set up, which would be to gather unfiltered water in bags/bottles and drink directly from them, the Squeeze works best but…

What I like about the Mini:

  • It is smaller and lighter than the Squeeze and can be used in all the same ways.
  • It has more versatile attachment points built in.
  • It costs less.

The next obvious question is which should you choose. I would (and did) probably just buy the Mini in most cases. It does everything the Squeeze does minus a little flow rate. It’s smaller, lighter, costs less, and a bit more versatile. However, the Squeeze is a bit easier to use in the most straightforward setup so it may be a better choice for cavemen.

Tips:

  • If you are using Sawyer’s water bags, roll them like a toothpaste tube instead of squeezing. They last longer that way.
  • Don’t let your filter freeze (true for all filters, not just these). It can wreck the filter media and there is really no practical way to test the Sawyer filters for damage. Bring it in your sleeping bag at night and tuck it inside your coat during the day to prevent freezing. If you think it froze, replace it.
  • 2 Liter bottles (or any bottles you can scavenge) are great for use with these filters. They are light weight and can be squeezed hard without breaking. Keep the cap so you can squeeze the air out and reseal to take up less space in your pack.
  • I know Sawyer has improved their bags but I have trust issues with them due to my original bags failures. Evernew makes great water bags that have compatible threads. I own several and greatly prefer them to the Sawyer bags. The threads on Platypus bags don’t quite match but some users say they can get them to work.
  • Filling water bags completely full unless you have some tricks up your sleeve. Blow them up with your mouth before submerging or place them under falling water to make filling easier. You can also make a lightweight scoop by cutting the top off of a bottle and capping it. The scoop makes it easy to get the last few ounces of water into the bag.
  • Even if you don’t hike and hate the outdoors, these are so compact and light that they are right at home in a car kit or “bug out bag”. I use a rubber band to wrap a water bag around the filter so it stays compact. You can add a short section of tubing so you can drink right from the source if necessary.
  • They are so small and light, you might even want to carry two – especially in cold weather.

If they were already convenient enough… You can stroll right into most Walmarts and buy them. They are available with a dizzying array of options and even multi-packs. I generally just buy the basic set up and I bought my Mini on Amazon for less than $20.

Sawyer PointOne Sqeeze Water Filter on Amazon

Sawyer Mini on Amazon

Powered by WordPress. Designed by Woo Themes