Archive | Reviews

First Look and Review: ROSCH Works SLM2

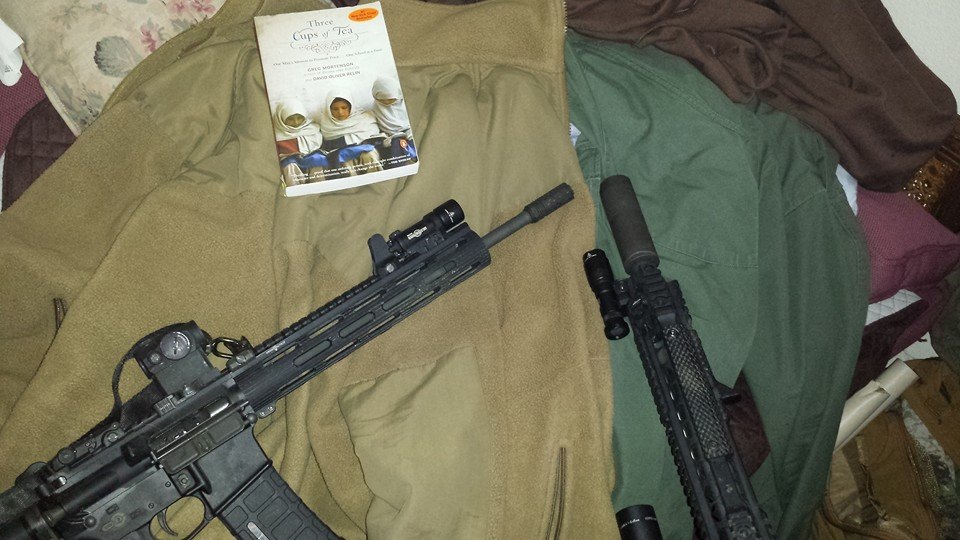
The following guest post and images were contributed by Daniel Appel. He contacted me about a review he had written for the yet to be released ROSCH Works SLM2. I enjoyed reading the rationale and background on how he arrived at this weaponlight solution so I agreed to publish it.

Daniel Appel is a former United States Marine, spending six years as a Crytologic Linguist (Arabic, Pashto) and SIGINT Support Team Leader.  He is currently pursuing a Masters of Engineering in Systems Engineering, and works as an Aerospace Machinist and Software Developer.  He has been active in the shooting sports since 2003, and also enjoys mountain biking and playing with Scottish Highland Bagpipe bands.


Rosch Works SLM2 and Surefire KM1 LED Head: Does this setup do it all?

When I first encountered the Rosch Works SL1 line of integrated weaponlight/front sight setups, I was very curious to see if I had finally found the lightweight and affordable solution I had been seeking for my compact handguard carbines.

On lightweight rails the majority of default real estate is available on the 12:00 top side (e.g. BCM KMR, KAC URX-4, Troy Alpha, DD SLiM, Centurion CMR, etc.). When it comes to making efficient use of that space while keeping the complete weapon system svelte, the Rosch Works SL’s are arguably the best possible solution, which is why it’s unsurprising to me that guys like Mike Pannone have been running the Rosch Works offerings for over a year now.

ROSCH_Works_SLM2_2

To further understand why the SL1 concept was so intriguing to me, I’ll explain a bit about my weapon mounted light and irons sights preference I bring to this review. My preferred setup is influenced very heavily by Larry Vickers and others who prefer the ambidextrous and rugged capability of Surefire (or similar) weaponlights mounted at 12:00 in conjunction with fixed iron sights or a fixed front sight post – for example the X300/X300U from Surefire mounted in front of a fixed front sight post or Daniel Defense 1.5 Fixed rail mounted front sight. For me this arrangement confers all the advantages of a constantly cowitnessed fixed front sight which also serves as an accidental light discharge mitigating tool for the X300 light mounted on the rail directly in front; my wife has adopted this exact setup for her pair of lightweight carbines.

On carbines I own with low powered variable optics, I wanted to retain that same inherently ambidextrous 12:00 mounting solution, but with the ability to run folding and/or offset iron sights. Furthermore, I have discovered through extensive experimentation that my preferred activation solution for weapon mounted lights is the Surefire Z68 tailcap (like Surefire Scout series lights). Again, the ability to press briefly and receive momentary light or push-through and have constant-on is quite desirable for me, and I prefer not to rely on remote switches if possible; so I’ve adopted running Surefire M300 and X600 scout lights, or VTAC L4 scout-like facsimile lights on non-offset aftermarket mounts at 12:00 as my answer for these rifles.

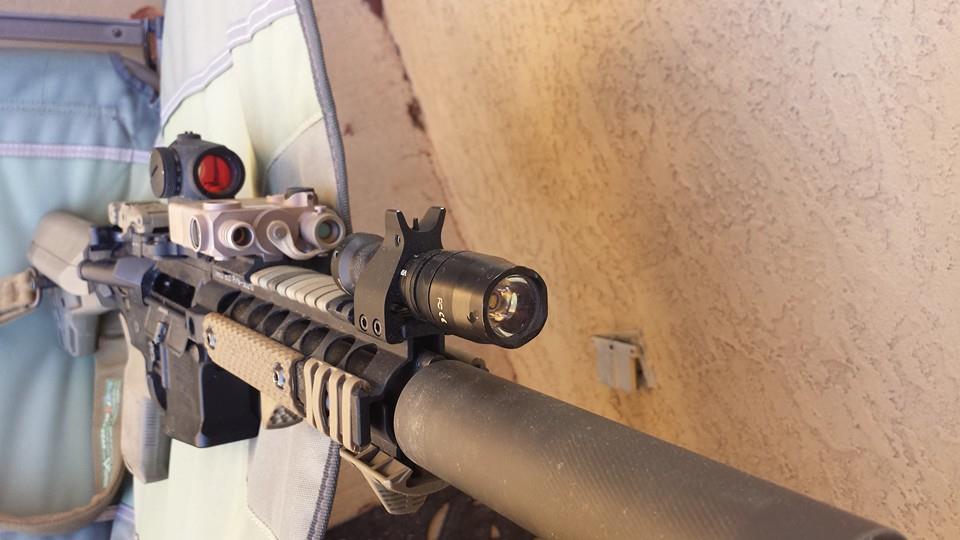
For even shorter handguards I was presented with a problem in the form of wanting to still run a 12:00 weapon mounted light with fixed iron sights and run this setup in front of a LDI DBAL-I2 also mounted at 12:00. This created a pressing need for a weaponlight that was compact and allowed for a fixed front sight. For what I wanted, the SL1 was almost the answer I wanted, but the SLM2 fits the niche as a truly ideal solution.

ROSCH_Works_SLM2_1

For the initial SL1 design, the benefits were undeniable: the very compact front-to-rear footprint possible with this setup was clearly desirable on shorter handguards, with a huge added bonus being the impressive weight savings. For these reasons alone, the SL1 is a truly remarkable light in it’s own right. If I was seeking a very affordable solution to a simple white LED WML and sight post space saver on a compact and/or lightweight carbine, I would be extremely happy with the existing SL1.

When I first went through this logical process, I contacted Don at Rosch Works, and asked if it was possible to perform a slight modification to the inside diameter of the existing SL1/SLM1 design to accommodate the Surefire Executive series of lights. What I specifically had in mind was running the exquisite Viking Tactics L4 Surefire lights (basically an E2D/E1B tube, Z68 Tailcap, and KX2/KX1 LED Scout Head). The initial answer was that of course it was possible, but Don immediately pointed out that I’d be basically crazy for wanting to do that, since the SL1 already does everything that light setup does with a higher output (250+ lumen torch) and lower cost (my complaints would likely be only related to the particular tailcap used on the Malkoff Devices light chosen for the SL1, and compatibility with Surefire Z68 and SR07 tailcaps).; but they’d start looking into trying to make the SLM2 (for SureFire executive series lights) setup anyway since it would allow use of the Surefire LED heads and integration with IR systems using existing remote switches like the Surefire SR-07-D-IT.

Once I got the go-ahead from Rosch that the SLM2 was a real possibility, I realized that I wanted something one step further: a White/IR capable weapon mounted light with integral front sight – even though this line of thinking was back in May 2014, I had a good enough understanding of Surefire product development timelines to make a reasonable assumption that eventually a KM1 LED Head (3V White/IR Scout Light Head from the then unannounced M300V Scout Light) would come out, and allow me to take a Surefire 3V Executive (E-1) body, install a Z68 Tailcap, and KM1 head and have myself a poor man’s M300V – an option not immediately available from Malkoff Devices.

This means that a Rosch SLM2 with the KM1-Vampire LED head becomes a truly one-of-a-kind triple threat bolt on part: a fixed front sight which houses a white/IR weaponlight. Not only is it the most compact and lightweight setup possible, the total price comes in well under $500 for a complete unit. In price comparison terms, a 3V Surefire Executive Body, Rosch SLM2, and Surefire KM1-LED competes directly with the much larger, heavier, and pricier M720V RAID system… which is too tall to be mounted at 12:00 and still lacks a front sight.

ROSCH_Works_SLM2_4

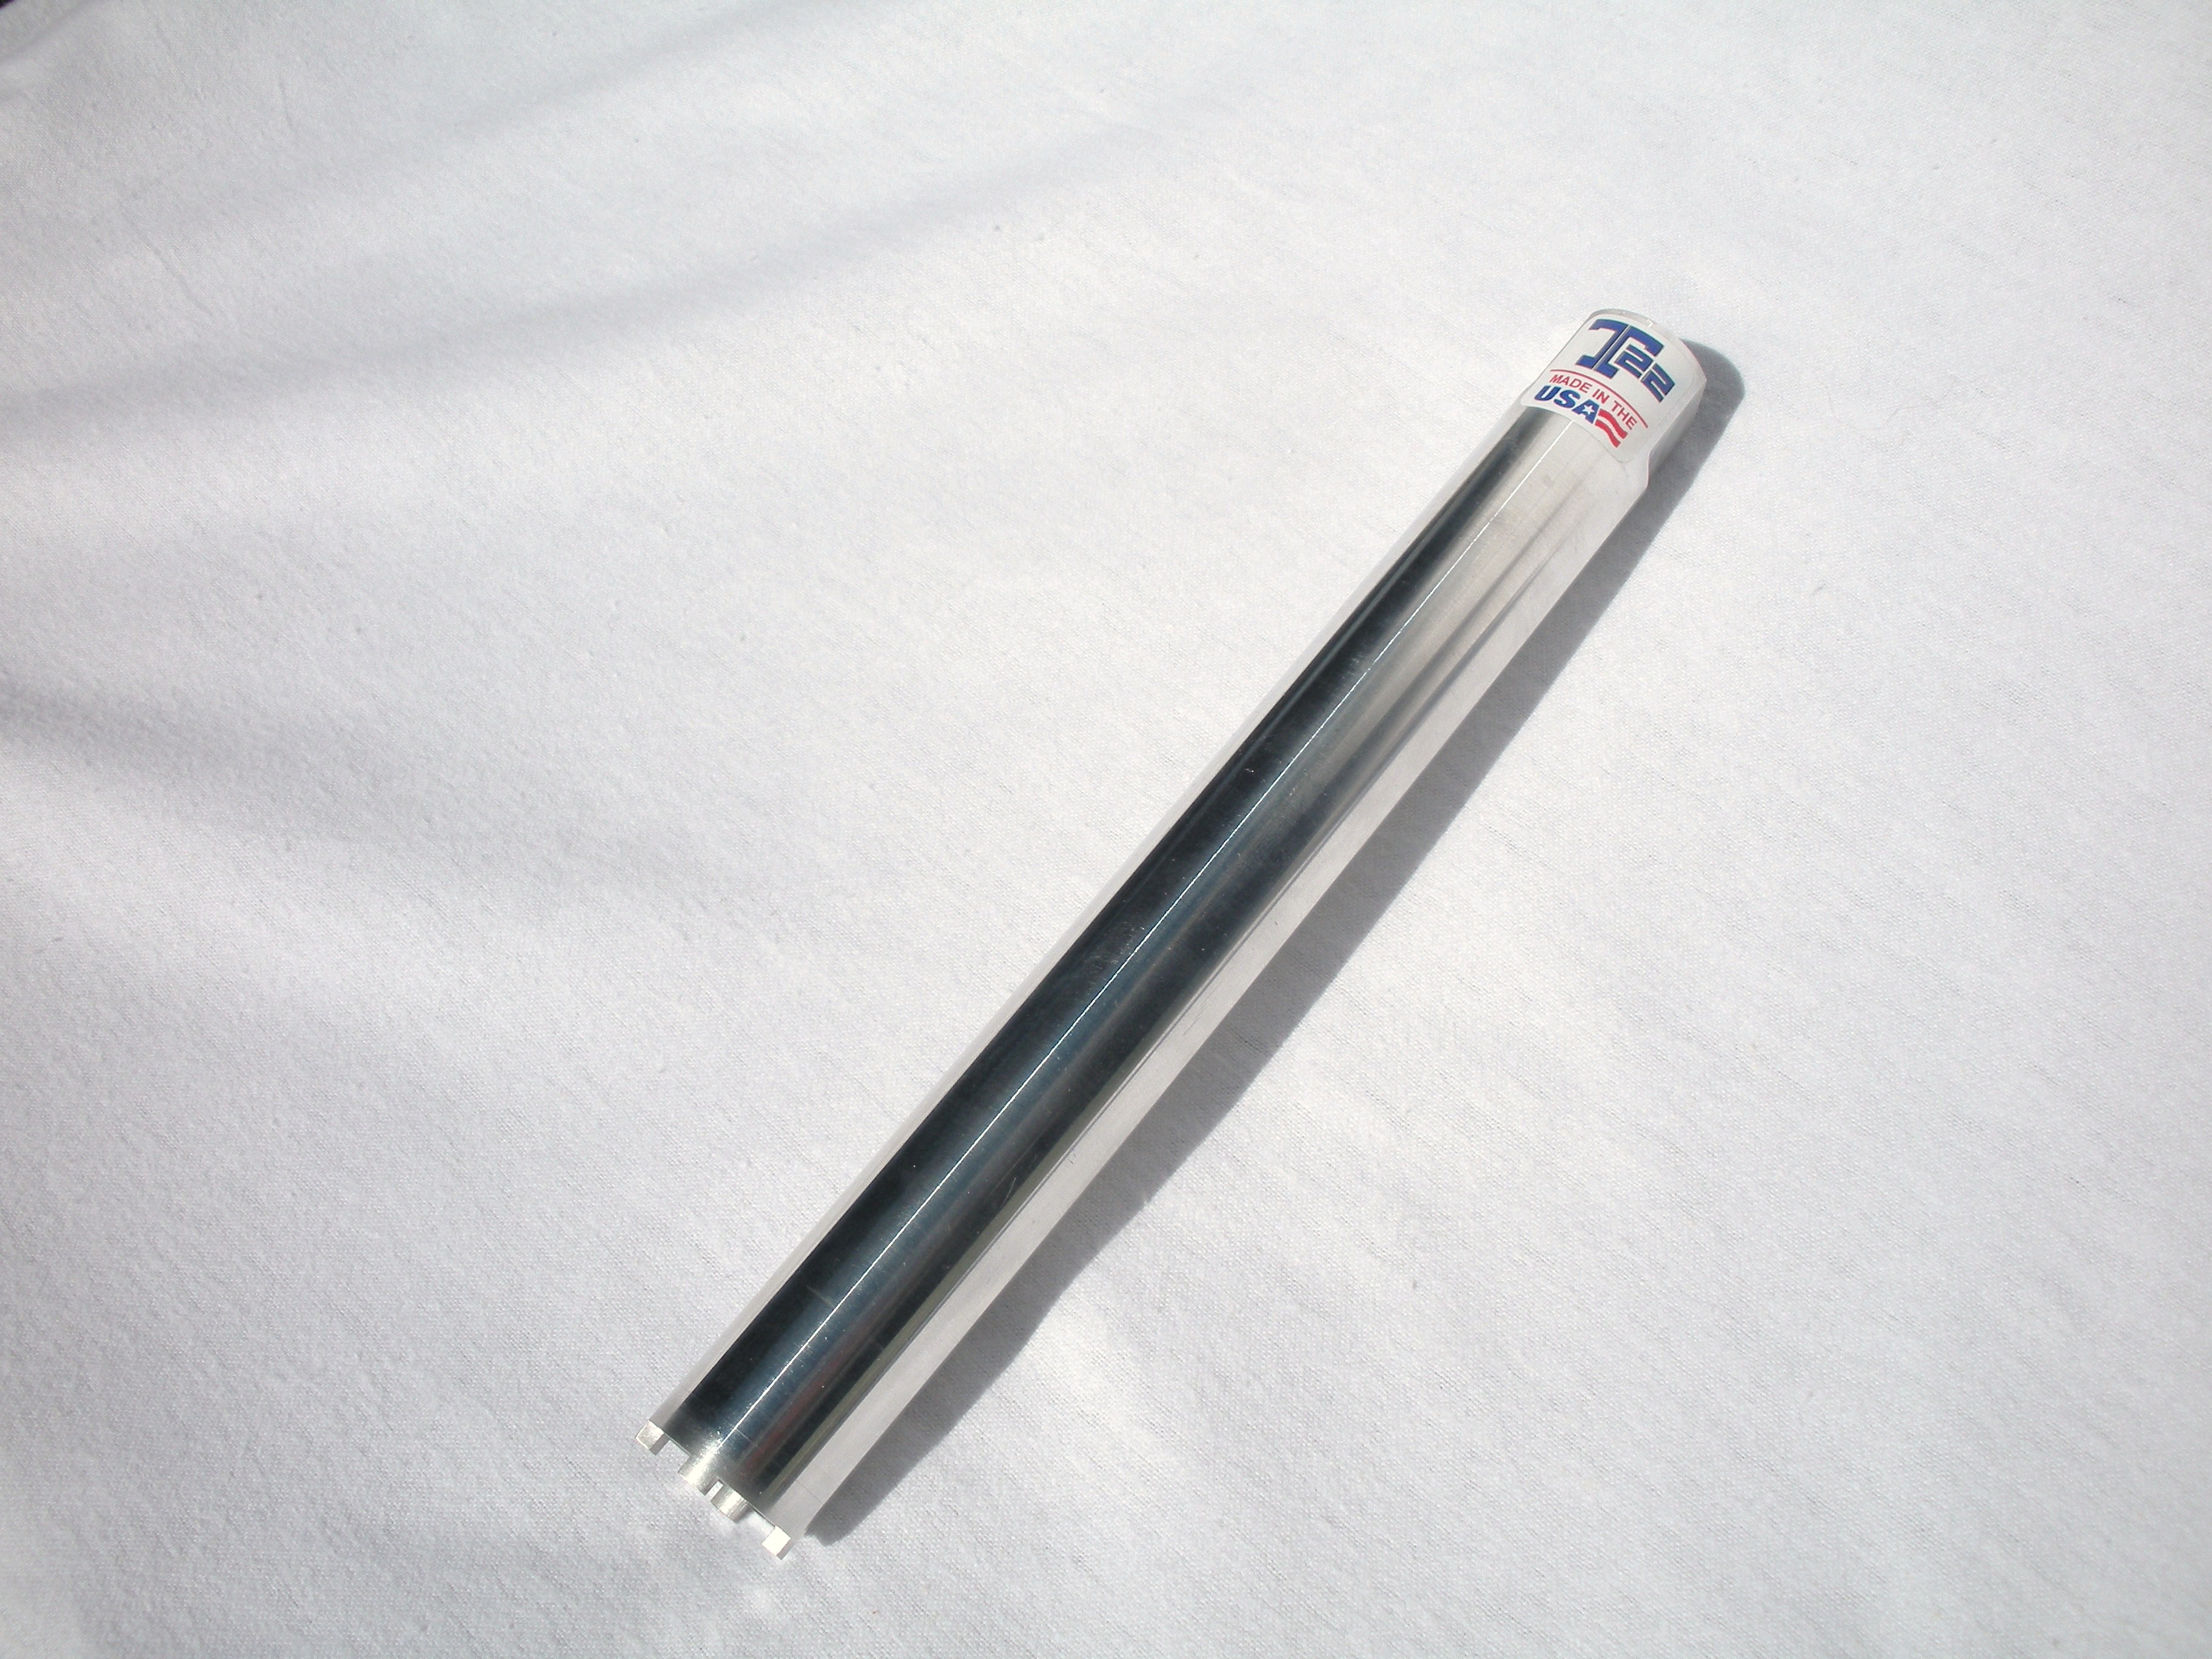
Feel, Fit, and Finish

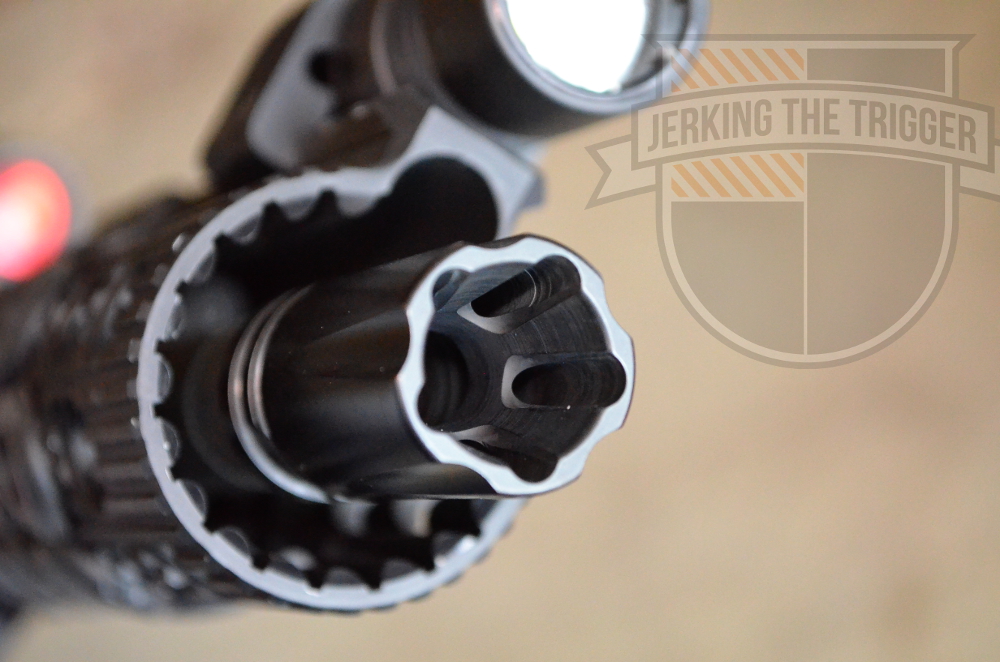
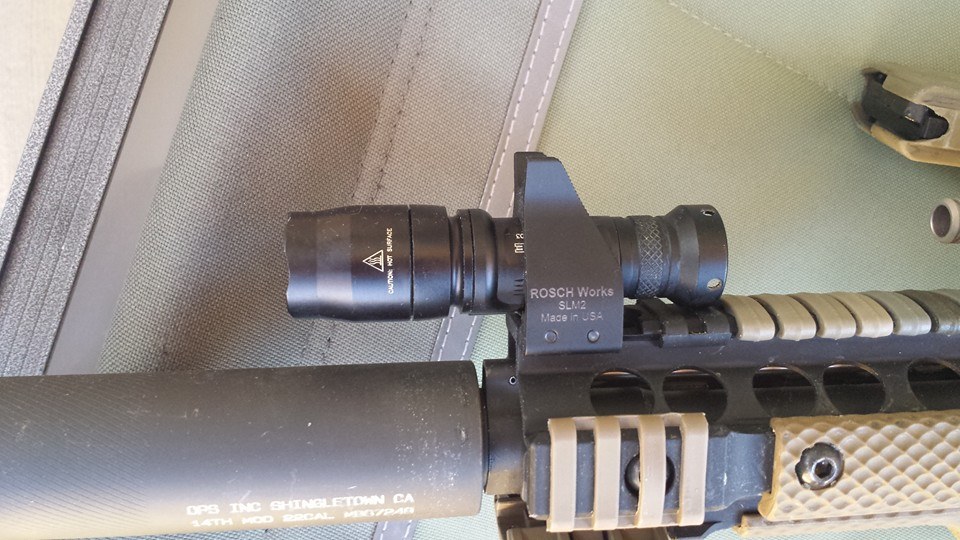
Having received a pre-production model of the SLM2, I can’t comment on the final packaging, but the remainder of the delivered setup is really quite attractive. The machine work is excellent, and on the three handguards I’ve mounted it on (KAC URX-3.1, DD RIS-II, and DD Omega-X12) the SLM slides on comfortably and tensions down solidly with no fuss. The surface under the anodize is remarkably smooth and devoid of tool marks, and any edges or corners that the user’s forward hand have the potential to interact with are neatly executed. The two rail clamp bolts use a 7/64″ hex key to tighten, and ended up just under flush with the opposite side, and actually allows small fore-aft placement adjustments for the entire SLM package before tightening the clamp screws; once tightened the solid engagement with the two screws and precise key cut clamp surfaces holds it in place securely. The ‘wing’s of the front sight to protect the post itself are concave from the inside face, with a sculpted flat outside edge – needless to say quite functional especially with the serrations continuing up the rearward angled face of them. Finally, the left side has elegantly subtle laser engraving with ROSCH Works SLM2 Made in USA markings. Arguably the best executed feature is the anti-glare serration of the angled rearward face, but it wasn’t completely without issue for me.

The only spot where I’ve had a partial issue is the lowest serration on the rearward face of the sight could be inadvertently displaced downward, or even have that section stripped away while installing the light tube into the mount. Really minor concern, and I suspect a direct result of the serration 3-D location being determined for a different diameter of flashlight tube, not to mention total non-issue once mounted (since it’s inaccessible) but there is an outside chance of displacing that bottom strip of aluminum and getting a decent cut while installing and setting up the SLM2 system – I’m still really happy to see the thoughtful and time/cost inducing sight serrations on there, which puts the SLM2 in the argument for best fixed front sight… even before the added capability of running a weaponlight through the body of the front sight.

The included front sight post (although it’s a bespoke sight post) is nearly standard width, which for myself alternating between the standard FSP type DanielDefense 1.5 Fixed Front Sights and the Knight’s Armament Co. 45° Offset Folding BUIS with it’s narrow SR-15 width FSP is actually quite usable. The post itself is a touch shorter than the standard offerings, primarily due to the flat bottom plane it sticks out of being higher because the sight base is also accommodating a flashlight tube (in this case 0.827″ Surefire E series), as well as having a slight taper towards the top – the net result is actually quite effective. The base of the post is round and threaded into the base, but there is a roughly 0.0625″ tall squared portion of the front sight post that can give purchase to a small square wrench, however a different tool (specifically a 5/64″ kex key) is actually required to make adjustments. The front sight threads vertically into the SLM base, and is held in place with a nylon ball and set screw from the right side which holds the front sight in place by tensioning the nylon lock ball into place against the threads. This arrangement allows for extremely precise height adjustments, but did present a rather amusing problem for me personally.

The SLM2 I received had the set screw tension installed at what seemed to be the maximum torque spec for the set screw (or that somebody’s idea of finger tight as recommended was a bit aggressive). The result was that the nylon ball intended to compress against the threading of the sight post wound up being compressed hard enough to lodge the ball itself in place preventing sight post rotation even after removal of the set screw – my resulting attempts to pry it loose with a paperclip wound up with me ejecting the small white nylon ball from the base onto some white carpet.

Despite my ‘brilliance’ in removal, I did miraculously find the tiny (~3.5mm) ball and was able to reinstall it. With a bit less torque applied, the sight post was still held in place brilliantly, but I was able to much more readily make front sight adjustments by simply backing off the set screw a turn and being able to rotate the front sight post with fingers instead of resorting to multitool pliers. In practice, the best option for setting the front post height is setting it to flush then making adjustments in full turn increments until a more precise solid BZO is set with fine tuned fractional rotation adjustments, then running a dab of thread locker on the set screw once it’s sorted (a tiny amount ideally, as one obviously doesn’t want some excess Loctite 242 in the threading for the sight post itself). Though Rosch Works states the threadlocker isn’t requisite for installation, I still consider this cheap assurance, especially considering the small size of the set screw and nylon ball it holds in place – same idea for the rail clamping bolts, as I don’t want them going anywhere either.

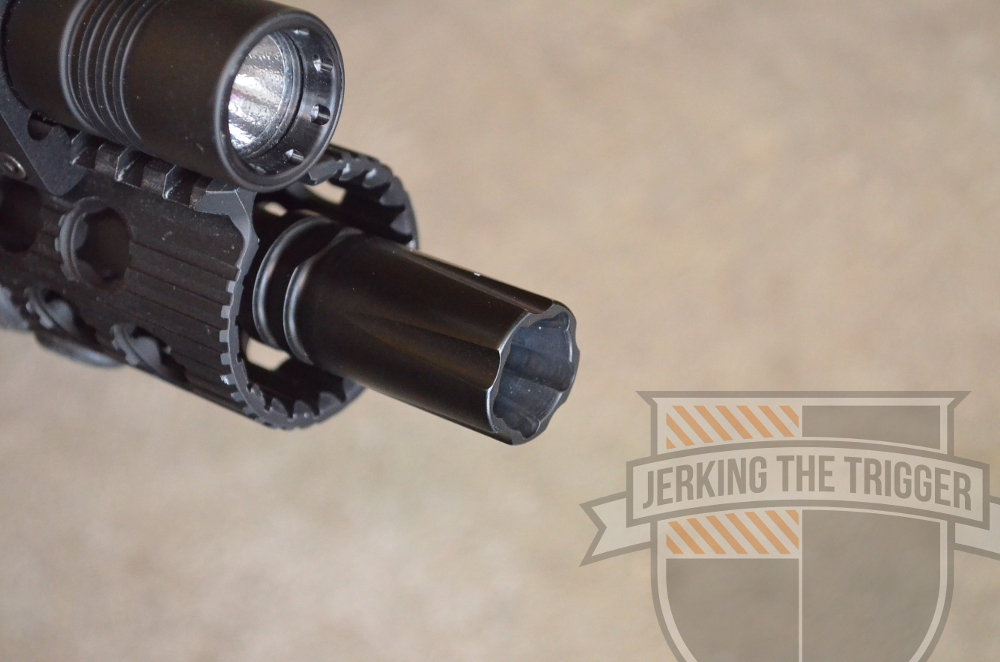
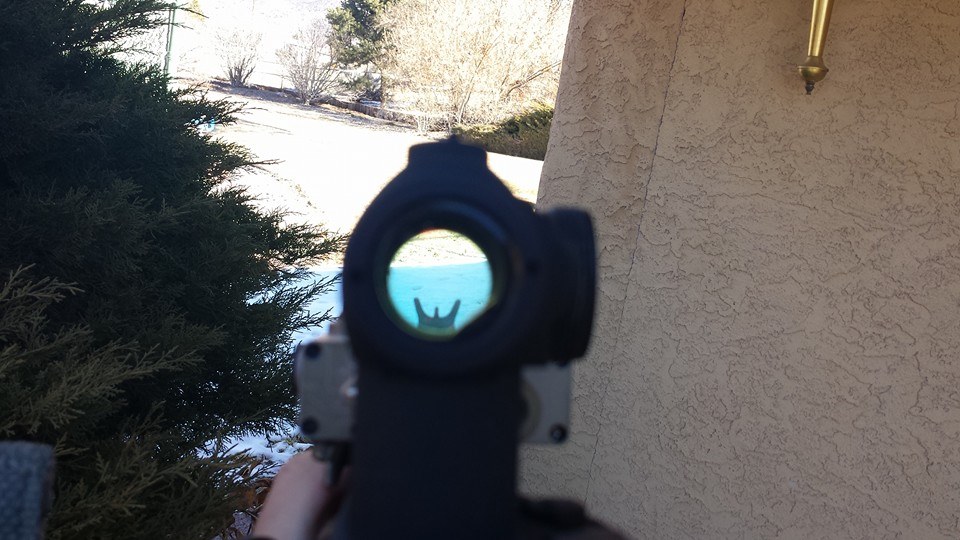
The net result from all this is that with the Z68 Tailcap and KX1 head (used by SureFire M300 Scout Light) the sight picture is remarkably uncluttered, with the front sight being quite prominent and quick to acquire as well as differentiate from the protective ‘wings’ on either side of the sight. The bezel of the weaponlight doesn’t even protrude into the sight picture, which is already an improvement over the X300 (bezel and battery door latch protrude slightly into the sight picture).

With the sight my SLM2 lives on (8″ URX3 handguard) the rear sight aperture of the Gen1 MBUS rear sight, the top-most corners of the front sight ‘wings’ end up tangent to the hazy rear sight in a correct sight alignment, which is nice – but also very sight radius and ocular distance to rear sight plane for operator dependent. In short, the SLM2 has an excellent sight picture appearance when ran with fixed or folding BUIS, and with or without a holographic sight.

ROSCH_Works_SLM2_5

Performance Testing

Testing a front sight with a relatively bulletproof flashlight still feels like the thinnest point of this review, simply because I haven’t dumped a ton of rounds down the pipe of any weapon this is mounted to, and probably lack the budget to send enough rounds to even create a problem with such a stout setup. So far the most abusive test I’ve put the SLM2 through is getting up from a magazine supported prone position while using the shade of my truck’s tailgate, idiotically catching the front corners of the front sight wings on something. Aside from adding a slightly shiny spot where I broke through the finish and dinged the aluminum, the sight is none the worse for wear – the BZO hadn’t shifted but the truck now has a decent ding on the steel bumper, so the worst part of that encounter was had by my beloved truck.

As far as actual shooting related performance notes, they’re minimal. This is actually my favorite shape/arrangement for front sights I’ve encountered – not once have I mistakenly acquired a sight alignment and sight picture with my brain mistaking a protective front sight wing for the actual front sight. Lastly, the slight taper on the front sight is yet another positive feature, albeit a minor one. When used in conjunction with a micro Aimpoint attached via lower 1/3 cowitness mount the SLM2 sits happily in the bottom half of the optic’s field of view, and using the Aimpoint Micro powered off as an oversized rear peep sight actually yielded adequate accuracy at 7yds. Ringing steel at 200yd to confirm BZO also went quite smoothly. In short, it performs as well as any fixed front sight could hope to, and considering my preference for weaponlight locations (and that every serious carbine should have a WML) if running a fixed front iron sight setup is the best option, then the SLM2 is the best option among those.

ROSCH_Works_SLM2_3

Closing Thoughts and Questions

– Who should consider buying the SL1, SLM1, or SLM2?

Anybody who wants or needs to run a 12:00 weaponlight mounting solution with a fixed front sight system, especially those with limited handguard real estate.

– Who the SLM2 is right for?

Any existing Scout Light users or shooters with a desire to mount an IR/White light ‘V’ series illuminator, or who wish to use the Scout series tailcap or SR07 remote pressure switches.

In short, any build where light weight, simplicity, and efficient use of handguard real estate is a priority, the cost for performance gained is really quite high – likely a reason why top carbine shooters like Mike Pannone seem to prefer running it.

The SL-1 complete system is still the best value and ideal answer for a pure white-light user seeking to set up an effective lightweight carbine, and the SLM1 equipped with a Surefire 6P-Fury or similar light is the best performance option for high output white lights, as well as being an excellent setup for activities like nighttime/low light hog hunting. The SLM2 really does fill a fairly small niche, but absolutely shines capability wise when compared to virtually any other weapon mounted electronics suite that provides infrared and visible spectrum illumination and laser designation when paired with things like the LDI DBAL-I2.

Disclosures

I wanted to guinea pig the Surefire Executive compatible version of the Rosch Works SLM so badly that I badgered Don into sending me one of the first models ready to be released into the wild. I did purchase the SLM2 and set of 1-cell and 2-cell light bodies at below suggested MSRP directly from Rosch Works in order to complete this review.

The SLM2 is still mounted on my personal Mk18 silhouette carbine.

Review: MagPod

MagPod has come a long way since I put hands on one of the early prototypes. The prototype that I handled impressed me enough to follow the multi-year development of the MagPod closely. Now that I have the production versions in hand, I am not disappointed.

Overview

MagPod is a drop-in base plate replacement for the current PMAG 30 Gen M2 MOE Magazines and previous versions of the PMAG 30 (it is not compatible with the GEN M3 PMAG). It is designed to make using the magazine as a monopod more stable and to aid in gripping the magazines.

MagPod 2

Background

To appreciate the MagPod, you really need to have some background in using the magazine as a monopod. This is not a new technique and, in spite of what the goober behind the gun counter told you, it won’t make your self destruct.

The 5.56×45 NATO (and .223 Remington) cartridges have tapered sidewalls which necessitates that the magazine have a slight curve to accommodate the stacked cartridges. The end result of the curved shape is that only a small portion of the base plate toward the rear of the magazine contacts the ground when it used as a monopod and the rifle is held level (or near level). You can create a very stable shooting position this way but with only small portion of the magazine on the ground, it is not as stable as it could be.

Technique and Observations from Use

When I go prone without the MagPod installed, I drive the magazine into the deck and provide fairly aggressive rearward and downward pressure on the fore end of the rifle. This locks everything down fairly but there are two issues. The first is that controlling recoil and stability is largely influenced by how much pressure I exert on the hand guard with my support-side hand/arm which means I am muscling the carbine a bit. Additionally, since the magazine is only resting on a small fulcrum point, the gun tends to rock a bit under recoil. The monopod technique more stable than an unsupported prone but not as stable as it could be.

The technique changes in an intuitive way when you install the MagPod. By intuitive, I mean that I didn’t really have to retrain myself or anything like that. The base plate is now supported at both the front and rear which adds stability. Additionally, the shape of the MagPod and its textured rubber pad on the bottom, allow the shooter to load it lightly – not unlike what you would do with a bipod. “Loading” a bipod, or in this case a MagPod, means that you lean into it slightly. In order for it to work, the bipod or MagPod must be able to bite into the shooting surface enough to resist your weight, effectively locking the rifle in place. Loading the MagPod adds to the stability and takes some of the strain out of the equation since you are now stabilizing the rifle with your own weight instead of the muscles in your support arm. The result is a more stable rifle with less muzzle rise and sits only a small fraction of an inch higher than it would without the MagPod. .

MagPod 1

One of my initial concerns with the MagPod was that it would only be stable when the rifle was leveled. I am happy to say that on ground that has some give, you can aim up or down several degrees before it feels like the magazine is lifting off the deck. Hard surfaces are less forgiving but even if it does lift, it is no less stable than using a magazine without a MagPod installed.

When you first purchase your MagPods, I highly suggest dragging out all your gear and checking to see how your MagPod equipped magazines will interact with your magazine pouches. If you use open top pouches or hard carriers, you will see no real change. If you use pouches with bungee retention, you will no longer be able to just slip the retainer off the mag to one side or the other since the “legs” on the MagPod will trap the bungee retainer. You will have to lift the bungee slightly to remove it. If your flap covered mag pouches lack sufficient adjustment for flap length, it is likely that the MagPod equipped magazines won’t fit. A little bit of dry fire and range time should get you sorted out in short order.

When it comes time to grab a magazine from its carrier, you will find that your little finger tends to wrap around the front leg on the MagPod, enhancing grip. This works for me whether I am using a “beer can” grip or running my index finger along the front of the magazine. If you have especially deep magazine pouches, the front leg works as a finger loop for digging out the magazine.

I like that the front of the MagPod features a series of series of eight small divots. These are to be used to mark your magazines with an identifying pattern in case you find yourself on a range full of MagPod shooters with magazines littering the ground around you. I rarely shoot by myself and most of the people I shoot with use PMAGs so I have been marking my baseplates with a pattern using a paint pen for years. I can continue that practice with the MagPod.

MagPod 3

Wrap Up

MagPods work. They add stability when shooting from the prone position. You will need to check them with your gear but you should have no problem making them work with most magazine carrying methods.

Review: Flimmuur Tactical Ultimate Dump Pouch

I was recently asked by Flimmuur Tactical to take a look at a dump pouch called the Ultimate Dump Pouch. I use dump pouches a lot. When I am on the range, I am usually working. That means I need to have things like pens, a pad of paper, tools, and other items close at hand. If I don’t have a specific pouch for it, it goes into the dump pouch. Of course, I also use them for their intended use of magazine retention. Flimmuur Tactical sent me a loaner to check out and after about 2 months of use, I have been able to form some opinions.

Flimmuur UDP on Belt Flimmuur UDP Over Stuffed

Overview

The Ultimate Dump Pouch’s front and back panels are made from LiteLok material and the sides are constructed from a single piece of heavy duty mesh. The opening of the pouch is adjustable with a shock cord and reinforced with webbing that is folded over and triple stitched to stiffen it like you might find in a gun belt.

The backing consists of a stiffened panel that mounts to a 2 x 2 MOLLE field or can be threaded onto a belt by passing the belt through a channel that runs behind the HDPE reinforced panel. Even the edges of the HDPE panel are bound. It also features a short adjustable strap with side release buckle that is anchored to the panel and used to secure the dump pouch when folded.

Flimmuur UDP Back

I have found that the Ultimate Dump Pouch will easily accept 4-5 AR-15 magazines without having to pay attention to how you drop them in. You can wedge 8 or more in if you are careful. That expanded magazine load is possible because the front panel is bellowed and that is they key to what I liked most about the Ultimate Dump Pouch. There will be more about this later.

Observations from Use

I’ll start with what I thought could be better. The opening is adjustable with a cord lock and shock cord but there isn’t enough slack in the channel that the cord rides in to allow much adjustment. The result is that you can’t really cinch the opening closed very far. This is good for making it easier to insert items, which was Flimmuur Tactical’s goal, but can allow items to pop out of the pouch in some situations (like when it is belt mounted on your back and you dive into a prone shooting position). It should be noted that this is common among many dump pouch designs. Dump pouch designers have to balance retention with speed. Flimmuur Tactical went with speed. That said, if the collar had more material, the user could decide whether they wanted to run it wide open or cinched which would be my preference.

Flimmuur UDP Opening

The Ultimate Dump Pouch is very well made. The materials are light but durable. The stitching is straight and even. All edges are bound. The bellowed panel is very cleanly executed. This is a quality pouch.

The mesh elements of this pouch work well. I often use my dump pouch to pick up brass after a range session. The mesh allows me to shake the pouch a few times to clear out dirt and small debris.

I like the flat cube shape of the pouch. It encourages the magazines to stay vertical when they are inserted which makes it easy to drop in other magazines. The shape is actually pretty ingenious and works well with the size to ensure that the magazines stay upright.

Flimmuur Tactical really nailed the opening construction of this pouch. The folded webbing edge with latitudinal stitching is genius. It is just like a webbing gun belt. It is stiff enough to hold its shape but still very flexible. This set up is ideal. It stays open on its own and if it gets crushed, it springs back open enough to be usable.

Finally, the best thing about the Ultimate Dump Pouch is how the size and the bellowed front panel work together which seems like a strange thing to say but it just works. The size is perfect for accepting 4-5 magazines without paying attention to how you place them. You can basically just drop them in. If you need to carry more, you can push 8-9 magazines in it thanks to the bellowed front panel. The beauty is that it is extremely compact, sized to carry a decent mag load that would be appropriate for a typical carbine course or similar, and still forgiving for oversize loads.

Flimmuur UDP Compact

Wrap Up

The Ultimate Dump Pouch is a solid dump pouch design. I wish the collar was more adjustable but the opening is well designed, the shape and size are great, and the bellowed front panel works perfectly.

Get in touch with Flimmuur Tactical via Facebook to get your hands on an Ultimate Dump Pouch.

Tacticool22 M&P 15-22 Barrel Nut Wrench

I have put a lot of rounds through my M&P 15-22 and I have changed the muzzle device a few times. All the shooting and tinkering added up to a slightly loose barrel nut. I noticed that accuracy was degrading a bit and my zero had wondered. I knew that a loosening barrel nut was a possibility so that is the first thing I checked when troubleshooting and once I established that as the issue, I went to Tacticool22.com to purchase a barrel nut wrench.

DSCN3296

Consider this a mini review. The service is great from Tacticool22 and the products are solid. The wrench was in hand 3 days after I ordered. It is a piece of thick aluminum tubing with teeth machined on one side and wrench flats on the other. You just slip it down over the barrel so the toothed end engages the barrel nut and use a wrench on the flats to tighten (or loosen). There is enough clearance inside the tube to pass over muzzle devices that don’t stray too far from normal dimensions.

It took surprisingly little movement to tighten the nut. It was barely loose but had a noticeable effect on performance. I suspect many people with M&P 15-22s have borderline loose barrel nuts and don’t even know it. If you own an M&P 15-22, I highly suggest that you invest in the barrel wrench because you will need it sooner or later. My only regret is that I didn’t order the barrel vise jaws that Tacticool22 offers at the same time as the wrench.

Review: Black River Tactical Covert Comp

I turned to the Covert Comp from Black River Tactical as a bit of a last resort. I tried several a handful of other linear compensators and found that, while they did direct the blast and flame forward, that is really all they did. The fireball created by the short AR-15 pistol barrels that I was using them on were nearly as large as they were with a bare muzzle. It just seemed like someone should be able to do better.

Black River Tactical claims that their Covert Comp, a linear compensator with a unique internal geometry, suppresses flash nearly as well as an A2 flash suppressor. I found that to be true on a 16″ barrel but the biggest surprise was the Covert Comp’s performance on an 11.5″ barrel.

BRT Covert Comp Angle

Overview

The Covert Comp is one of the most compact linear compensators on the market. It is just under 2″ in length which is significantly smaller than most. It weighs 2.2 ounces which is roughly the same as an A2 flash suppressor.

It also features a Melonite QPQ finish for durability and corrosion resistance. In my experience, Melonite finishes are basically corrosion-proof. You will have to go out of your way to get it to rust.

Linear Comp Background

I should probably start by explaining what a linear compensator is for those who may not know. In its simplest form, a linear comp is a muzzle device with a cone-like internal shape that opens away from the shooter. This cone shape redirects the concussion and hot gasses that escape the muzzle forward and away from the shooter. This generally has a compensating effect on muzzle rise, slightly increases felt recoil (equal and opposite reaction), and reduces the PERCEIVED sound level to the shooter and those around the shooter. It does not actually reduce the sound. It just redirects some of it down range. Manufacturers of these devices will often add a sort of blast wall/baffle that can help mitigate the recoil enhancing aspect of a simple cone design linear comp.

These devices also tend to be very neutral in how the muzzle moves (no up, down, left, or right movement) since the muzzle gases are not directed in any specific direction but rather spread evenly around the bore and pushed forward. However, it is up to the shooter’s skill to completely capitalize on this performance. A capable shooter will find that the firearm basically just recoils straight back with little to no muzzle rise.

The largest downside to these devices is that they do very little to reduce flash. They generally produce impressive fireballs that nearly match the size an intensity of a bare muzzle. This is often accepted as the trade off for the slight reduction in ear splitting concussion at the shooter’s position.

BRT Covert Comp Side

Observations from Use

That is enough about linear comps in general. Let’s dive into the Covert Comp itself. The performance of this device is great but until you actually try it, the most attractive feature will be its size. Many of the linear compensators on the market are absolutely pigs. They can be larger than a film canister (remember those?) and weigh 6 ounces or more in some cases. The one that I used previous to the Covert Comp is considered one of the more compact options available. It is a little more than 1/16″ longer and almost an ounce heavier than the Covert Comp. Suffice it to say, the Covert Comp is one of the most svelte devices of this type.

I don’t normally comment on how something looks because tastes vary so widely but it is appropriate in this case given the outlandish designs of many linear comps. Many of the linear comps on the market seem to be in a competition to see which can look the most like one of those jacked up Bro-Trucks. The Covert Comp is understated in both its Smooth and Fluted version. The Smooth version is a simple cylinder in appearance and the Fluted version just adds some small flutes to break up the profile. I appreciate that.

I test the Covert Comp with three different types of ammo (62gr 5.56 Lake City SS109, 75gr .223 Black Hills Blue Box, and 75gr .223 Prvi Partisan) and on two different barrel lengths (11.5″ and 16″).

I generally don’t think of using this type of muzzle device on anything other than a short barrel but my time with the Covert Comp may have changed my mind. The best way that I can describe the performance is in comparison to the A2 flash suppressor. If you can imagine a device that suppresses flash just as well as the A2 but has less muzzle rise and similar recoil, you would know what it is like to shoot the Covert Comp on a 16″ barrel. It is a very well rounded device, providing very neutral muzzle rise mitigation and very acceptable flash suppression with quality ammo. It changed the way I think of linear comps. I now see their potential as all around muzzle devices rather than just a niche item for short barrels.

The biggest surprise of the test came when I tried it on one of my 11.5″ pistols. On the 11.5″ barrel, it wasn’t just nearly as good as an A2. It was better! The previous linear comp that I used on this build did a good job directing the concussion but it still produced a roughly beach ball sized flash with every shot. The A2 seemed louder at the shooter’s position and still produced a roughly basketball sized flash. The Covert Comp produced a dull orange flash that ranged in size from grapefruit to volleyball. There was certainly still visible flash but the internal geometry of the Covert Comp was working some magic. In my opinion, this is incredible performance on a short barrel compared to any linear comp that I have tried… and many flash suppressors that I have tried.

BRT Covert Comp Interior

Wrap Up

I started this review looking for a muzzle device specifically for shorter barrels. By the end of the review, I find myself wondering why more people aren’t using linear comps on longer barrels. The answer is probably that they haven’t used the Covert Comp yet. I am exceedingly impressed with how well rounded this device is. It has changed what I expect from muzzle devices of this type.

Check out the Covert Comp at Black River Tactical. It is available for a variety of common calibers.

Powered by WordPress. Designed by Woo Themes