Tag Archives | Tactical Handyman

Tactical Handyman: No Slot? No Problem!

Don't let the lack of a pre-made slot keep you from mounting your Mount-N-Slot where you need it.

When it comes to attaching Impact Weapon Component’s Mount-N-Slot hardware, don’t limit yourself to only the places that you have a pre-made slot. The flat sides of the Magpul MOE Hand Guards make attaching a Mount-N-Slot in a custom location an easy task.

In this installment of the Tactical Handyman, we will mount a Mount-N-Slot Rotation Limited QD Sling on midlength Magpul MOE Hand Guards. The midlength MOE Hand Guards lack slots on the sides close to the receiver which is a shame because this is an optimal place to mount a sling swivel.

The midlength MOE Hand Guards lack slots on the rear sides. This is where we will attach the Mount-N-Slot.

Materials:

  • Mount-N-Slot of your choice
  • Magpul MOE Hand Guards
  • Drill with 7/32″ bit
  • Ruler (with long straight edge)
  • Pencil
  • Awl (optional but can be useful for cleaning up or slightly enlarging the drill holes, a Swiss Army Knife works great)

Measure carefully and mark your two drill locations as outlined in steps 3 through 5 below.

Procedure:

  1. Check that your Ar-15 is unloaded by removing the magazine and then visually inspecting the chamber. Once you have completed this, check it again. Remove all ammunition from your work space.
  2. Remove the MOE Hand Guards from your AR-15.
  3. Use your ruler and pencil to draw a line that runs through the center of the slots, parallel to the bore. NOTE: The results of steps 3-5 are shown in the picture above.
  4. Mark the drill hole closest to the delta ring on the line taking care to place it in such a way that the Mount-N-Slot can lay flat when mounted.
  5. Mark your second drill hole by measuring 11/16″ from your first hole. The two mounting points on a Mount-N-Slot Rotation Limited QD Sling are about 11/16″ center to center. You will have to measure any other Mount-N-Slot you may be using.
  6. Drill both holes using a 7/32″ drill bit.
  7. Clean up the holes as necessary with an awl or small sharp knife.
  8. Attach the Mount-N-Slot per manufacturer instructions using the two newly drilled holes instead of a slot.

This is a simple project with a big pay off in increased functionality. Mounting the sling in this location improves the range of motion you will have with the AR slung and keeps the hand guard well clear so you have plenty of room to hold it with your support hand.

Remember to use the coupon code “triggerjerk” at checkout to receive 5% discount at IWC.

wordpress hit counter

Tactical Handyman – PJ Cotton Ball Fire Starters

Starting a fire when conditions are less than favorable can be a real challenge. Successful fire starting starts with training but a having the right gear certainly helps. What ever gear you choose should give you a high likelihood of being able to start a fire across a broad spectrum of conditions. One such piece of gear is Petroleum Jelly Soaked Cotton Balls (PJCB).

PJ Cotton Balls work like a candle. When they are lit, the flame will consume all of the petroleum jelly before it consumes the cotton. The cotton is acting as a wick and, conveniently, it also happens to light very easily. The PJCB will continue to burn for several minutes which will hopefully give you enough time to build a sustainable fire. As a bonus, you will find that the petroleum jelly has other uses like moisturizing cracked hands or lubricating stuck sections of a fishing rod.

Materials:

  • Cotton balls (raid the wife’s make up drawer, there are probably tons of them in there)
  • Petroleum jelly (AKA Vaseline)
  • Storage container (film canisters work well)

How to Make PJCBs:

  1. Locate a small container that seals securely. The container should be small enough to fit in your survival/EDC kit. It must seal securely because PJCBs can be a bit messy.
  2. Rub the cotton balls in the container of petroleum jelly until the outside is coated thickly. Some people like to warm the petroleum jelly so it permeates the cotton ball but I prefer to leave the inside of the cotton ball somewhat dry. More on this later.
  3. Place as many cotton balls as you can in the container. It is that easy.

How to Use PJCBs:

  1. Do all fire prep before you light anything! Gather tinder, kindling, and fuel sized pieces of burnable material. Have them sorted and ready. You may even want to make some fuzz sticks (feather sticks) with your knife.
  2. Rip open a PJCB. This will expose the dry inner fibers of cotton. The dry fibers can easily be lit with a spark (such as from a ferro rod/fire steel) or a flame. They can sometimes even be light by focusing light on them with a magnifying glass. You may not need to use an entire PJCB.
  3. Light the PJCB using your preferred method. I like to use a ferro rod.
  4. Add your flammable material starting with tinder, then kindling, then fuel. Be careful not to add the material too quickly or you will smother the flame.

Be sure you practice these techniques before you actually need them. This is a VERY easy way to start a fire if everything is done correctly. You can light several fires from just one film canister full of PJCBs. The Tactical Handyman is always ready!

Tactical Handyman – Flashlight Maintenance

You already know why you should carry a quality flashlight and you have already dropped some serious coin on the best light that you could afford. So, now what? A lot of guys know how to maintain their firearms. They may even know how to maintain the knife that they carry clipped in their pocket. But how many Regular Guys know how to maintain their flashlights? That’s right, that piece of absolutely essential life saving gear that you carry so you can see in the dark needs some occasional maintenance.

The o-rings, threads, contacts, and mechanical parts all need some attention once in a while. Parts need to be cleaned and lubed to promote the best function of the light. You may want to consider doing the following procedure at least once or twice a year if you are carrying the same light everyday. If you do this maintenance regularly, you will increase the likelihood that your light will be ready when you need it.

Materials:

  • A flashlight
  • Light oil (NO WD-40!!! CLP works pretty well and you probably already have some)
  • Lithium grease (I like the dielectric bulb grease that many auto parts stores sell.)
  • Cotton swabs
  • Rag
  • Rubbing Alcohol
  • Replacement o-rings (as necessary)

Procedure:

  1. Disassemble your flashlight down to its major components. In most cases this will be tail cap, bezel (or head), and body.

    Click on any image to enlarge.

  2. Inspect the o-rings. There will likely be an at least 1 o-ring at each sections of male threads. Replace them if they are cut, torn, or broken. This will keep the light water resistant and pocket lint resistant.
  3. Wipe the threads and o-rings with a rag to remove most of the old lubrication. Then use a cotton swab dipped in rubbing alcohol to thoroughly clean the threads and o-ring. Remember, with some lights, the threads are an electrical contact. They should be kept clean for best performance.

    Clean and lube all threads, including the female threads.

  4. Apply a light coating of grease to the threads and the o-ring. O-rings should always be greased. This will make the light more water resistant and protect the o-rings from wear and tear.
  5. Clean any electrical contacts with rubbing alcohol soaked cotton swab. This will help clean any oxidization from the contact that may hinder performance. You may also want to look into a product like Deoxit if you have a lot of oxidization on the contacts.

    Electrical contacts should be shiny.

  6. Place a drop or two of oil down into the mechanism of your tail cap and work the switch a few times. This is especially important on “clicky” style tail caps since they have more moving parts. The mechanism can often benefit from some lubrication and cleaning just like any other mechanical object. I usually just use CLP because I have plenty of it and it contains cleaners as well as lubricants. The switch (tail cap) is just about the only moving part in a flashlight. If your light is going to fail, it will happen at the switch. Do not neglect this.

    Try to get a drop of oil down into the mechanism.

Don’t forget the more obvious maintenance tasks. Replace your batteries at least once every six months, even if you don’t think you need it. This is akin to doing a tactical reload on your handgun after use and before you holster it. You want you light in the best condition possible because you don’t know what will happen next. If your still using a flashlight with an incandescent bulb, you may want to consider swapping it out once a year for the same reasons. Switching to a newer LED based light is an even better idea.

Taking care of your flashlight really isn’t rocket science. The whole procedure will probably less than 10 minutes. That is time well spent.

wordpress hit
counter

Add to FacebookAdd to DiggAdd to Del.icio.usAdd to StumbleuponAdd to RedditAdd to BlinklistAdd to TwitterAdd to TechnoratiAdd to Yahoo BuzzAdd to Newsvine

Tactical Handyman – ACOG Fiber Optic Fix

Trijicon ACOGs are excellent optics for fighting rifles, especially when having to deal with extended distances. The ACOG’s combination of size, durability, and speed make it one of the best choices for an AR-15 optic. The ACOG has been battle tested in Iraq and Afghanistan and has come through with flying colors. It has also become very popular in the competition shooting world – especially 3Gun competition. It is a proven system.

The Problem

One of the ACOG’s best features can also be one of the most annoying. The fiber optic illumination system on the ACOG allows the reticle to glow brightly in full sun and automatically adjust to changing lighting conditions. When there is no ambient light present the reticle is illuminated by the tritium insert. It all sounds great until the task at hand calls for any amount of precision. In full sun, the reticle can be so bright that it begins to flare. This flaring obscures the view of the target and makes it difficult to shoot with any level of precision.

I used to just use electrical tape to mask the fiber optic tube of my ACOGs. However, this is an all or nothing solution. It fixes the flaring problem but it doesn’t allow the fiber optic to gather any light in intermediate and low light situations. This solution was too static. I needed something that was more dynamic – something that would allow me to adjust to different lighting quickly and easily.

I tried making a hook and loop flap that could be stuck to the ACOG and peeled back to varying degrees to expose or cover the fiber optic tube. This worked great in my living room. Once the rifle was actually run through some drills a problem became obvious. The flap would catch readily on my gear, sometimes pulling it almost completely off the ACOG. So this solution was dynamic but it wasn’t durable.

Finally, I took a page out of the 3Gun play book. Shooters in 3Gun have been using bicycle tire inner tubes to cover the fiber optic for years. Typically a piece of inner tube is cut to length and then stretched over the optic. This effectively covers the fiber optic while still allowing for some adjustment by peeling the tube back. Inner tubes are tough and cheap. This idea has a lot going for it. This was my starting point.

The Solution

What I ended up with really works. It is securely mounted on the ACOG and will not snag on gear. It blocks almost all light from entering the fiber optic but also adjusts rapidly and easily to any lighting condition. It costs pennies and is easily replaceable.

Here you can see the cover in place. It is basically one length of tube that has been cut into two loops connected by a strap.
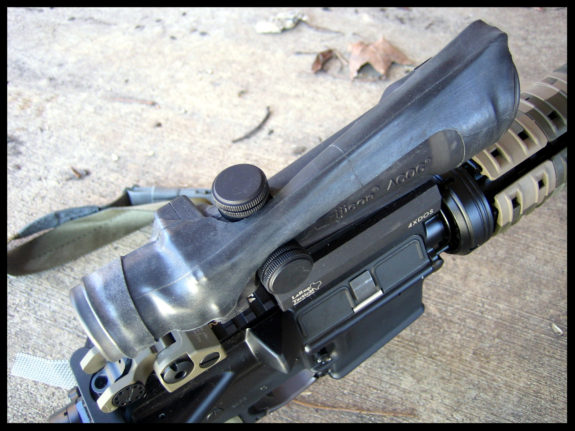
Pull the strap over the elevation knob to allow some light gathering. The short length of electrical tape is there to block the little bit of ambient light that can still to the back of the fiber optic.
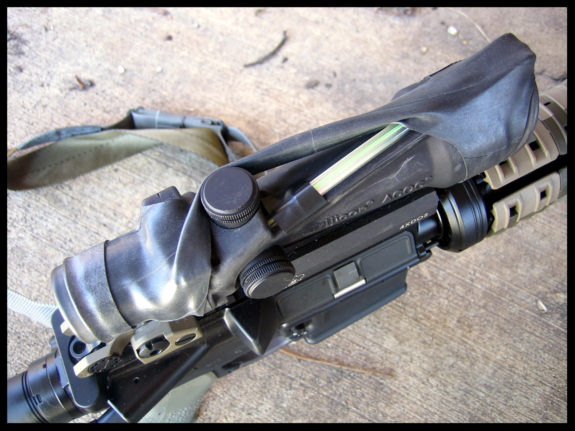
Pull the strap over the windage knob to allow even more light. I have found that on the TA11 ACOGs, with their extra long fiber optic tube, this is more than enough exposed fiber optic for just about all lighting conditions.
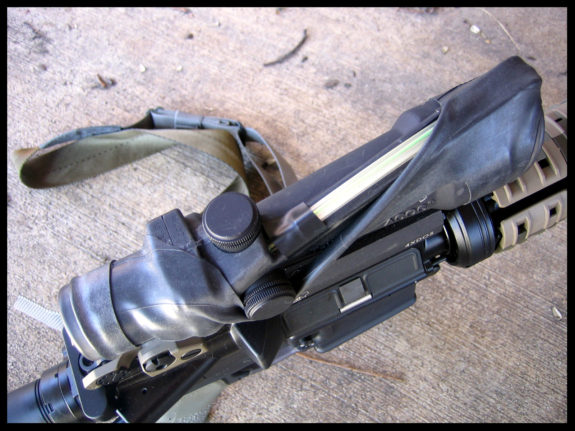
What you will need:

  1. ACOG equipped rifle
  2. Bicycle tire inner tube – a piece roughly as long as your ACOG
  3. Sharp scissors
  4. Hobby knife (or any knife with a sharp point, I used a Swiss Army Knife)
  5. Electrical tape (optional)

Instructions:

  1. Check that your rifle is unloaded and remove all ammunition from your workspace.
  2. Check it again.
  3. Cut a length of inner tube to roughly the length of your ACOG using your scissors.
  4. Measure the length of the hole you will need to cut to clear the base by laying the tube over the ACOG and marking the locations indicated in the picture.
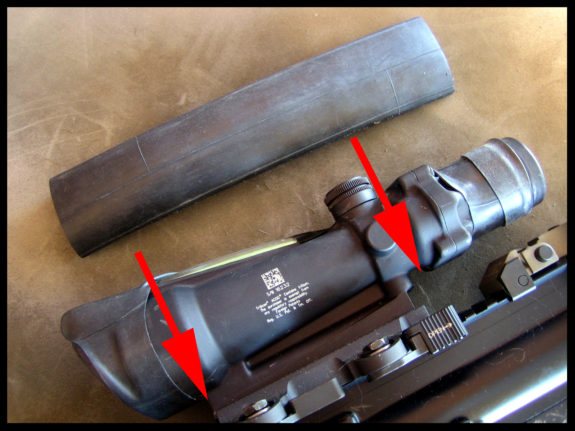
  5. Cut the hole about two/thirds of the way up the width of the inner tube. The idea is to leave a strap that is just wide enough to cover the fiber optic tube with some overlap.
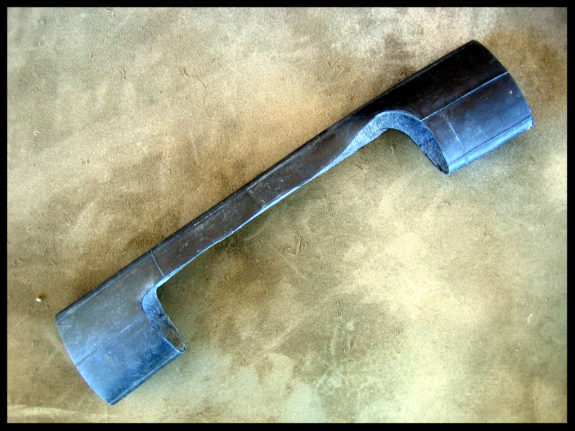
  6. Trim all of your corners so that they are rounded. Any corners left pointed or square can create stress cracks in the cover as it is stretched.
  7. Cut an angle that matches the leading edge of the ACOG on the leading edge of your inner tube. Shaping the front of the cover like this will help you cover the leading edge of the fiber optic tube.
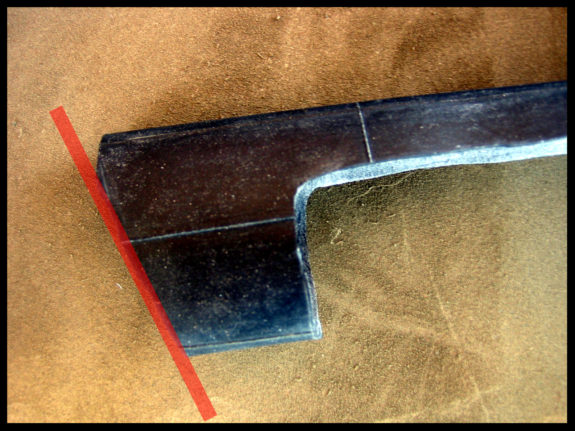
  8. Stretch the inner tube onto the ACOG and twist it as necessary to cover the fiber optic tube. The fiber optic tube runs at an angle so you will need to the twist the cover so the strap covers the tube. It should be difficult to stretch.
  9. Adjust the fit as necessary by trimming excess material from the inner tube.
  10. Trim around the elevation turret cover with your knife. This will help the cover lay flatter over the fiber optic tube.
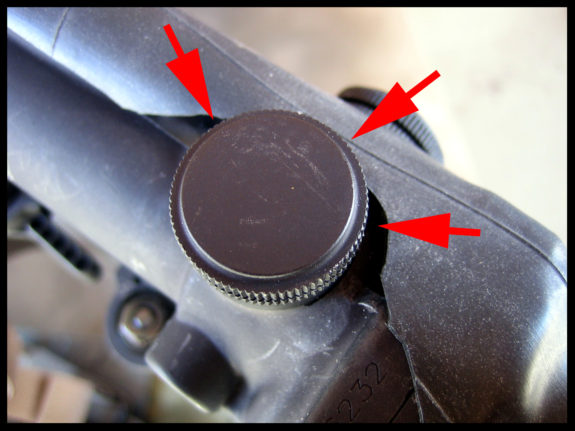
Optional Step: You may want to place some tape on the front 1/2 inch and back 1/2″ of the fiber optic tube. This will help cut down on light that may reach the tube from the front of the cover and around the elevation turret.
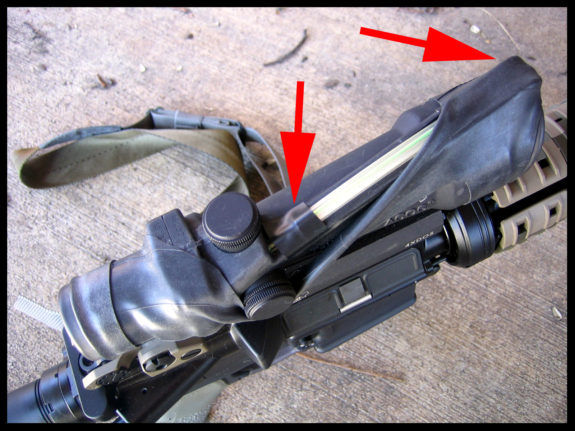
That Was Easy!

That was simple, cheap, easy, and effective. There aren’t many things in life that you can say that about. Is is easy to make another if this one ever breaks. You could even make a spare and keep it on your gear.

Problem solved.

Let me know if you have any questions!

NOTE: This works best with ACOGs that have long objective ends that project forward of the mount like the TA11 and TA33.

NOTE: Keep your cuts as clean and rounded as possible. Right angles and jagged cuts create stress risers that will cause the cover to rip prematurely.

Powered by WordPress. Designed by Woo Themes