Tag Archives | Nitecore

On Foot, Off Grid: Nitecore F1 Charger

The Nitecore F1 Charger doesn’t look like much but it is nothing short of amazing when it comes to portable power. Its main function is as a battery charger for lithium batteries like 18650s and 16340s (RCR123) but it can also serve as an ultralight battery bank. If all that wasn’t enough, it supports through-charging which makes it a valuable companion to any portable solar panel. It does all that in a very compact, 1-ounce form factor. It’s basically the ultimate charger for the outdoorsman.

Overview

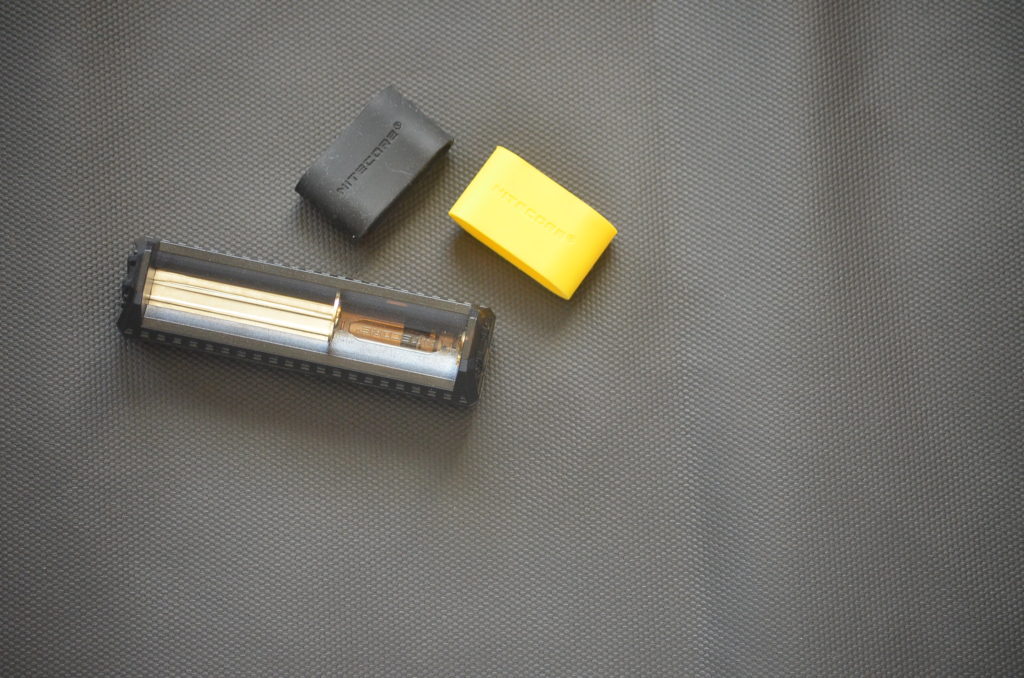
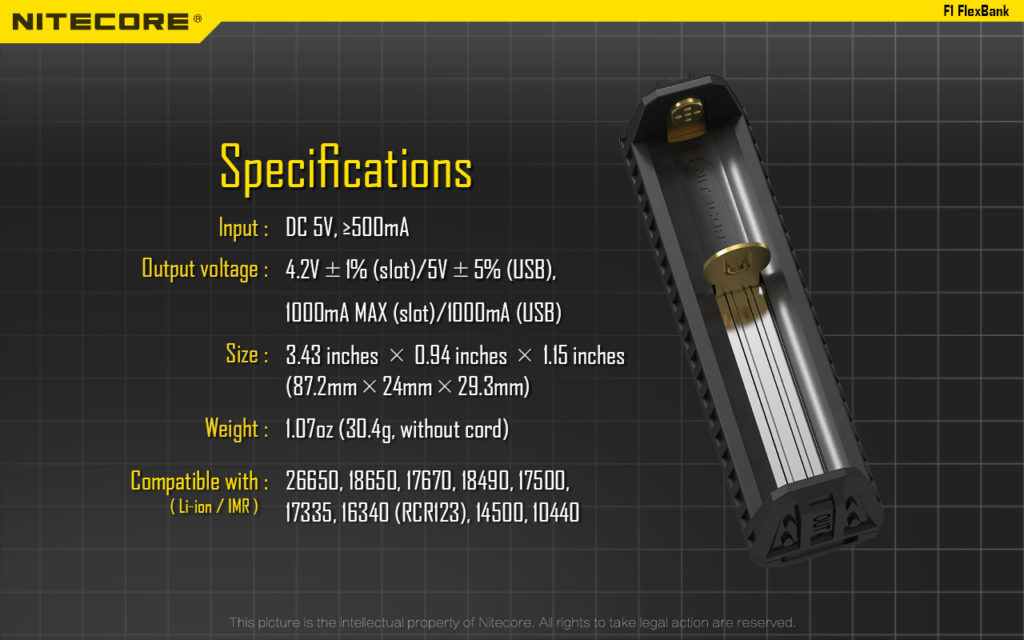
The Nitecore F1 is made from lightweight but strong polycarbonate with a spring-loaded, sliding battery contact that supports a number of common lithium batteries (26650, 18650, 17670, 18490, 17500, 17335, 16340(RCR123), 14500, 10440). It has three tiny LED indicators that are used to read out the voltage of the battery and indicate status for the charger. It also comes with 2 rubber bands (you only need one, the other is a spare) that are used to ensure the battery stays in place.

The F1 features a standard Micro USB in port allowing it to be powered by any USB power supply like wall warts, computers, solar panels, power banks, and more. It also has a standard USB out port for its power bank functionality. It allows the F1 to draw power from a battery and feed it to another device like a cell phone.

The F1 also supports through charging meaning that it can charge the battery and power the USB out port at the same time. This is key to its solar utility (more on this later).

Observations from Use

If you were on a really tight budget and didn’t mind charging just one lithium battery at a time, the F1 would actually serve well as a very basic home battery charger. It can even read out the voltage on a battery and tell you it charge status based on its simple LED display. It works just as well in the field or in a vehicle. It is a simple but capable charger.

The F1’s ability to be used as a power bank really adds to its backwoods versatility. It will provide 5 volts, .5 amps via its standard USB out. That is relatively slow for charging something like an iPhone but it will get the job done. I know some ultralight hikers have even used it successfully in place of heavier traditional power banks… just be sure to carry extra 18650 batteries!

All of the above is great but the F1 really comes into its own when used with solar panels where it addresses two major issues. First, most chargers require somewhat consistent power levels or they produce a charge error and stop charging. This is obviously not ideal for solar where the power that the panel provides fluctuates constantly based on the solar conditions. The F1 is different. I have never been able to produce a charge error with it. It seems to happily keep charging, hanging on at just a trickle, when clouds roll in. Then it recovers seamlessly when the solar conditions improve. If your panel is producing power, the F1 seems to be able to put it to use.

The second solar issue that it solves is with devices that are finicky about constant power levels when charging. For instance, many smartphones like to have a constant power level when charging. If the power provided by the power drops it will likely cause an error and the phone stops charging. If this happens while you aren’t babysitting the solar panel, you can miss out on a lot of valuable charging time. The F1 can be placed inline between your panel and your phone (or other devices). The panel charges the battery and the battery provides a consistent amount of power to the phone. The power never sags (unless you deplete the battery) which ensures there are no charge errors. It acts very much like the batteries in a home-based off-grid solar system. It won’t be the fastest charger you have ever used but it can provide some peace of mind.

Alternatives

There are a couple of other chargers that I have used outdoors including the Olight UC Magnetic Universal Charger (click to see the review) which has the advantage of working with NiMH cells and an amazingly compact form factor but lacks the solar utility or power bank functionality.

Additionally, I have used the larger XTAR VC2S in a similar role. It can charge two batteries at once and also acts as a power bank. This is a very full-featured charger but it is significantly larger than the F1. It is somewhat solar compatible but long interruptions in sunlight can produce charge errors from which the charger will not recover without intervention. Still, when used with something like a Suntactics Solar Panel with their very smart automatic restart functionality (more on this in a later article), this can be an excellent charger/power bank for extended trips.

Note: It can be tempting to try the Nitecore F2 which is similar but accepts two batteries. However, it is not nearly as solar compatible so I found it to be far less useful.

Wrap Up

The Nitecore F1 is a 1-ounce wonder. It’s a good battery charger. It’s a passible and ultralight power bank. It’s indispensable for backcountry solar. It also only costs about $10! If you are using a solar panel in your hiking gear, this can add some great capability and flexibility.

Where to Buy:

I doubt many of you will be able to find the Nitecore F1 Charger in a brick and mortar store. Ebay typically has competitive prices on the F1 as do many flashlight/battery websites. Be mindful of counterfeit Nitecore items. When I purchased mine, Amazon had the best price with shipping included: Nitecore F1 on Amazon


Do you have a gear or concept recommendation that fits the On Foot, Off Grid series? Tell us about it in the comments below or drop us a line on the Contact page.

The above URLs may be affiliate links.

Review: Nitecore P18

The Nitecore P18 is one of Nitecore’s newest lights in their P Series (Precise Series). It is aimed at the “tactical” market and manages to shoe-horn 1800 lumens into a surprisingly compact package. It also packs a number of interesting ideas that made me jump at the chance to review it.

Overview

The P18 is just over 4″ long and weighs in at 3.7 ounces. It utilizes a CREE XHP35 HD LED to pump out up to 1800 lumens and is powered by a single 18650 rechargeable battery (included). It comes packaged with a manual, sheath, extra o-ring, and lanyard.

This light boasts a completely silent “tactical switch” and die-cast aluminum construction, both of which really piqued my interest.

Observations from Use

I consider this light to be very ambitious with a number of forward-thinking ideas and concepts. It is VERY different in construction and operation than any light I have ever used so it should come as no surprise that some of the ideas in this light really connect and some could probably be improved.

The tree line in this photo is 40 yards away. Turbo mode is activated. This photo does not do the spill beam justice but you can see the intensity and size of the hot spot even at 40 yards.

Beam – The P18’s beam is balanced with an emphasis on flood. It has a relatively wide, defined hotspot with an ever-so-slightly donut-like hole in the middle. This “hole” is slightly noticeable on a white wall but it is so slight that you do not see it outdoors. The spill portion of the beam is wide and bright. The engineers at Nitecore appear to have successfully balanced both throw and spill. I find it excellent for all-around use.

Construction – I think the die-cast aluminum body design of this light is very successful. It is a unique shape for sure but it is a shape and construction method with some strong advantages. First, it seems to handle heat very well, staying cooler on turbo mode than other lights I have with even less output. Second, the flat-ish sides allow this light to ride in the pocket VERY comfortably and easy to index which is important given the switch configuration. The overall shape and benefits of the die-cast body are some of my favorite things about this light. I was pleasantly surprised with how much of a difference it made in the overall experience with the P18 and I hope Nitecore continues to play to with this concept with future lights.

Switches – The P18 has two switches: a small round switch on the side that controls only the red LED and a larger switch that controls all of the white light options on the tail of the light. Both switches are metal so there are no rubber boots to wear out.

The tail switch is shaped roughly like a rectangle and is located directly next to the P18’s battery cap which can make pressing the switch a little awkward unless the light is oriented in your hand correctly (which is easy to do thankfully). It is what Nitecore calls a “silent tactical switch” which means it has no feedback at all – no click and no real change in resistance. This can take some getting used to since half presses are required to move through the UI (user interface) and the line between a half and full press is minimal. I would prefer that the switch offered more feedback as I think that would make the UI a little easier to deal with. As it stands, I think that one of the things holding this light back is the main switch.

User Interface – The user interface of this light is relatively easy to move through, but, as stated above, the switch can feel like it is fighting you at times. I actually like the output spacing between modes but given the complexity, I find this better suited as an outdoor light than a tactical light.

The UI offers 5 levels of white light, 3 flashing white light modes, a red light mode, and a battery charge level indication. All modes are accessed via two switches.

The side button controls the red light and allows direct access to ultralow white light.

  • Press and hold to activate the red LED.
  • Press and hold to deactivate the red LED.
  • Press and hold the side button and tail button to access ultralow mode directly.
  • Long press (3+ seconds) to view the battery level indicator flash sequence.

The rear button controls numerous white light functions.

From Off:

  • Press and hold the main button to enter Turbo mode directly (after a short delay). Release to turn light off.
  • Press and release to enter the last used output mode. The light remains on after release.
  • Half press to enter last used mode. Release to turn light off.

From On:

  • Half press to switch between output modes (including Turbo).
  • Half press and hold to access Turbo mode directly. Release to return to last used output mode.
  • Full press and hold for 1 second to enter the special modes (strobe/beacon/SOS).

As with most flashlight UIs, they look more complicated on paper than they really are. However, this is more complicated than I would like in a tactical light but the multiple modes and all-around useful beam shape make this handy as a camping/hiking light in my opinion. In fact, I really like it in that role. It is also important to point out that this UI has two important features: direct access to turbo and direct access to ultralow.

Battery – The P18 can be powered by 2x CR123A/RCR123 or 1x 18650 battery. It comes with a flat-top 3100 mAh 18650 cell. The light is limited to cells under 67mm in length. It can operate with longer protected 18650 cells but the tail cap will not fully close rendering the light susceptible to water ingress. The use of CR123A or RCR123 cells will remove access to the turbo mode (high mode replaces turbo for all direct-access functions). The cap will fully close on 2x CR123A cells.

Build Quality – The build appears to be very good on this light. The threads and o-ring came greased from the factory. The tail cap turns smoothly with no grittiness. The LED is well centered in a flawless reflector. There is no dust under the lens. The finish is evenly applied and attractive.

Other Observations – The pocket clip on this light is excellent. It grips the pocket well and, because of the mostly flat sides of the light, it allows the light to carry very comfortably in the pocket. It is not reversible which seems like an unfortunate oversight.

Wrap Up

Nitecore markets this light for the “tactical” market and I think that is a miss. The switch and user interface conspire to make it just a bit too complex for that market. The switch doesn’t offer enough feedback to allow the user to work within the UI effectively. However, I find this to be an excellent light for outdoor use and I applaud a UI design that offers direct access to both the brightest and dimmest white light settings.

I was surprised at what a positive functional difference the shape and unibody, die-cast construction make. I hope that Nitecore continues to innovate this unique shape and construction method.

Flashlight.Nitecore.com


Nitecore provided this light, free of charge, for review.

New from Nitecore: NU05 LE Signal Marker

Nitecore sent us details on their newest addition to the NU series of headlamps and signal markers. The NU05 LE expands on the signaling capabilities of the original NU05 and targets the law enforcement market specifically.

The NU05 LE has 5 different modes, all of which are flashing modes: white, red, blue, green, and red/blue. All the modes can be accessed from a single button. The modes output between 2 and 20 lumens depending on the color and run for 15-18 hours on a single charge. The NU05 LE is USB rechargeable and has a charge indicator that allows the user to check battery condition in the field.

The included bracket is backed with hook material to attach to loop material on a ballistic or bump helmet. It also has hooks that can help route bungee retainers for an even more secure attachment.

Nitecore.com

Nitecore TIP2

At just 1″ x 2.5″ x .5″, the Nitecore TIP2 may be small but it boasts a ton of features and impressive output. It is small enough to serve as a keychain light but bright enough to do real work.

It can provide up to 720 lumens of light thanks to two Cree XP-G3 S3 emitters mounted behind TIR lenses. It also has 200, 30, and 1 lumen settings. Runtimes range from 15 minutes for the turbo mode all the way to 55 hours for the 1 lumen mode and all that power is provided by a rechargable Li-ion battery.

The TIP2 features a lanyard/key attachment that is held onto 1 piece CNC machined body of the light via strong neodymium magnets allowing it to be quickly removed from the keychain or lanyard for handheld use. This also allows the light to be mounted on any ferrous surface for hands-free use.

I am just scratching the surface of the features and potential applications for this light. You can check it out at Nitecore.com.

Powered by WordPress. Designed by Woo Themes