Archive | Tactics and Training

A Safe and Easy Way to Control Your AR in the Woods

This article is about an exceedingly simple and safe way to control your AR (or AR pattern) rifle during movement in the backcountry. This is not a sexy technique. This is probably not even the right technique for some user groups. This may not even be original to me (though I didn’t learn it from any other source). This is just something that works.

The Problem…

Moving through areas with a lot of brush or areas that require a lot of bending over to pass through, your slung AR can swing on its sling or interact with your surroundings or your own gear in strange and unsafe ways. This is doubly true in winter when you wear heavier layers and you are more likely to do things like ducking under trees bent over by snow load. Snow can turn even wide, well maintained trails into a backcountry travel experience.

This magazine was ejected by brush into about 12″ of powdery snow. If it had not hit my shin, I would have never known. Movement in difficult to travel places does weird things to your gear.

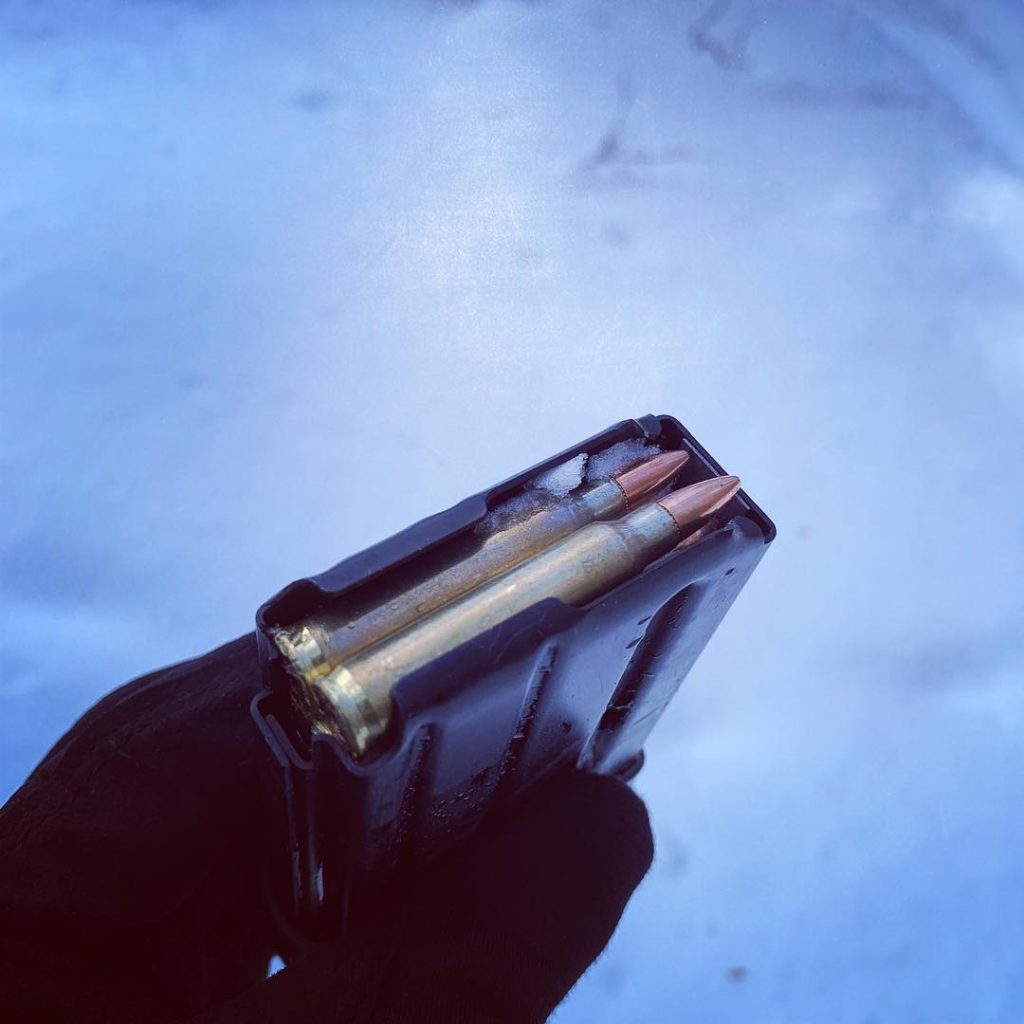
I enjoy snowshoeing in winter for exercise and adventure. Just this winter alone, I have seen someone’s selector swept to the fire position and I’ve had my own magazine ejected. Both of these events happened while moving through or under natural impediments and by no intentional interaction on the user’s part. Sometimes it is the brush itself that causes the problem. Sometimes the user’s gear causes the problem when the rifle dangles and rubs against the wearer while they move.

This also starts to get a little bothersome when you think of what your muzzle is doing while you navigate these kind of obstacles. It may be swinging across your feet and legs or dipping into the snow. Neither of which are safe.

My Solution…

There is a natural solution to this problem… just maintain some control of the firearm. This can be difficult when traversing difficult terrain but it must be done. The conventional wisdom is to maintain a firing grip with your strong hand but, truth be told, I want my strong hand free for work when doing things like holding back branches that would otherwise go at my eyes, hanging onto the something during a steep side traverse, or stabilizing myself with a third point of contact while I duck under low limbs.

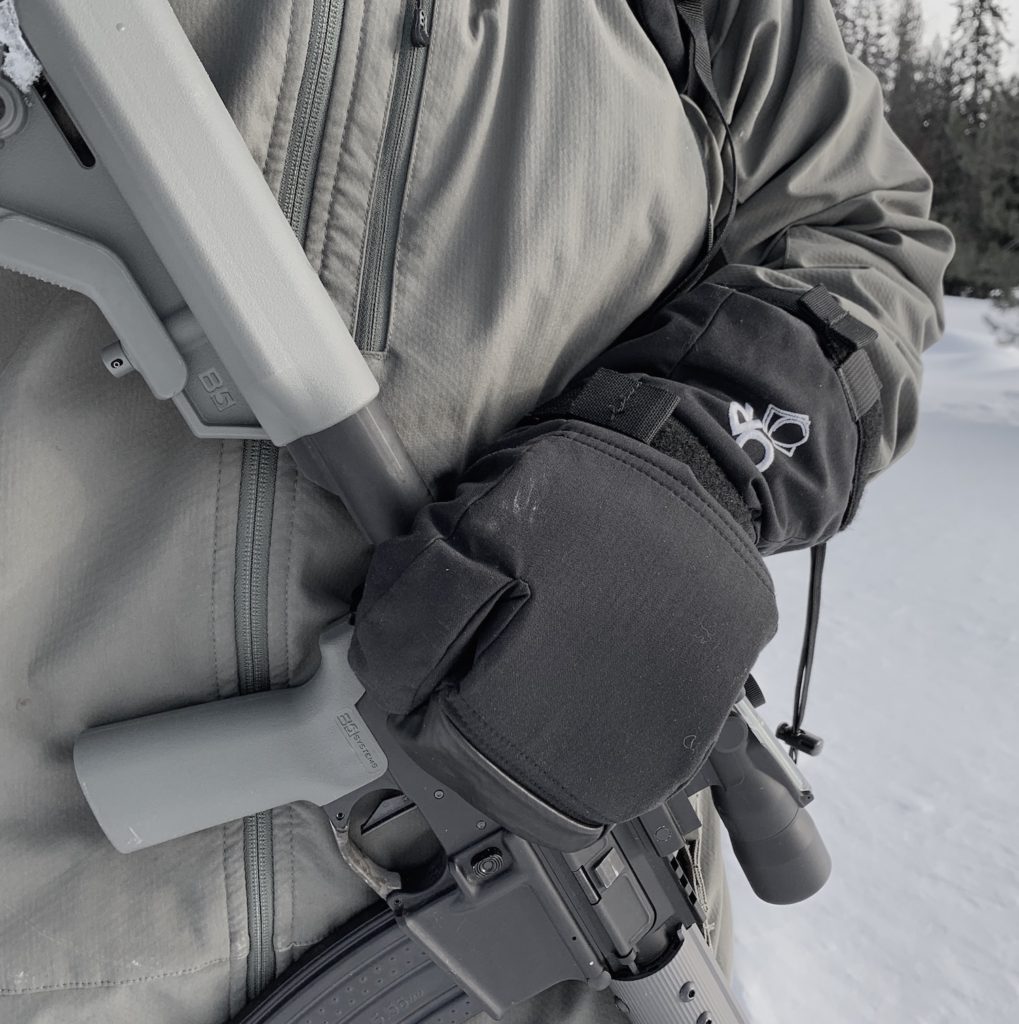
What I do is simple. I use my support hand clamped around the back of the receiver where it meets the buffer tube. I hold the rifle here and use my thumb (and my middle finger too if I have an ambi safety) to hold the selector in the safe position. I also apply some very slight downward pressure at this point on the rifle which, when using a two point sling, automatically rotates the muzzle up and to the side so it doesn’t dangle across my legs or dip into snow. The more downward pressure I apply, the higher the muzzle rotates.

It even works in heavy gloves or mittens! You can see where I grip the rifle. What you can’t see is my thumb blocking the safety on the back. This AR also has an ambi safety so I am controlling the selector with my middle finger as well. Even with slight downward pressure, the muzzle is held out away from my legs.

This technique blocks the safety, controls the muzzle, and keeps the rifle from swinging all at the same time. It also keeps all my digits away from the trigger guard and allows me to immediately free my support hand should I start to fall because my hand is coming in from the top of the rifle. Controlling my AR in this manner has become second nature to me.

Wrap Up

This article is already way too long considering I am just talking about a way you can hold your slung AR with one hand. Honestly, it is such a simple thing that I hesitated to even write about it. I can see how some user groups would be hesitant to take their firing hand off the rifle but that isn’t me. I’m just a guy in the woods. This works.

Maybe I need to come up with a catchy name for it like… the “North Idaho Reach Around”. Nah.

New from RE Factor Tactical and GTGConsult: GTG Baseline Target

RE Factor Tactical and GTGConsult have collaborated on a new target – the GTG Baseline Target. Read on to learn more…

The GTG Baseline Target is the brainchild of GTGConsult, a premier training company based out of Denmark. The target was designed by Ebbe 
Wolff, a 15 year veteran of the Danish Army and the lead instructor of 
the company.

The GTG Baseline Target is one of the best paper shooting targets for 
anyone looking for a training solution that offers multiple training 
scenarios. The shooting target offers both traditional and 
non-traditional overlays that allow you to run a wide variety of pistol 
and rifle shooting drills, tests and exercises.

For more information on GTGConsult visit: https://www.gtgconsult.com
where you can also find and download a wide variety of shooting drills 
specifically supported by this target.

– Developed by GTGConsult
– 23 x 35″
– Printed in the USA

Kit Badger Ambush Targets V2.0

Kit Badger’s Ambush Targets V2.0 (KBAT 2.0) are now available. These targets are visually similar to the original KBAT with the important difference that the V2.0 is represented with a side profile.

Everything that made the original KBAT a good target is still intact. They can still be printed on standard 8.5×11″ paper. The KBAT V2.0 maintains the heavy outline for the main target area and the lightly rendered anatomy reference lines so they they essentially disappear when viewed from a slight distance.

Kit Badger offers these targets as free printable resources: KBAT 2.0 on KitBadger.com

Shaddox Tactical Padded Weight Pockets

If you are looking to add some weight to your ruck without tearing up your pack or your back, check out the Padded Weight Pockets from Shaddox Tactical. They make three sizes for 20, 30, and 45 pound weights. These pouches are designed around GORUCK plates (or similar) to mount via PALS webbing inside GORUCK bags but they can also fit other bags.

These pouches are constructed from two layers of 1000D Cordura Nylon with closed cell foam padding between layers. The top flap is secured with Velcro and features a Velcro/PALS field for attaching small pouches or moral patches.

Check out the Padded Weight Pockets at ShaddoxTactical.com.

When Using Lasers on Handguns, Don’t Neglect the Sights

Lasers on handguns aren’t really en vogue any more but they are still useful. Visible lasers are a great addition to smaller defensive firearms, especially those with marginal sights that aren’t easily corrected like small frame revolvers. A good laser can make firearms like these easier to aim and extend their useful range but that doesn’t mean you can forget the sights, no matter how rudimentary they are, altogether.

At first blush, it would be easy to find yourself under the impression that once you have installed a laser, you’ve basically created a gun that all but aims itself in any lighting condition and from any shooting position. It would also be easy to reinforce this notion with dry fire and even live fire practice at the range. That simply isn’t the case.

I am not trying to say lasers are difficult to use or aim. Lasers are easy to aim in many situations… and that is the problem. Even when you present the gun in such a way that the it is not already oriented perfectly to the target, it is generally easy enough to move the aiming point based on the visual feedback of the projected dot on a surface behind or around the target. This is exactly the situation that most people are presented with when they train with a laser and it becomes their reality or expectation of reality. There is almost always something directly behind or around their target be it an interior wall during dry fire practice or a backstop on the range.

Many shooters, even those who train regularly, have never thought of what happens when the surface behind the target is removed because it is not something they have encountered. With no backstop, a laser equipped firearm can be aimed in such a way that the dot is not visible because it is projecting out into the space around the target and not on a surface that registers the dot.  Think of a target on a stand in the middle of a pasture or large parking lot. The dot would not be visible unless it was projected on the target itself or the ground near the target. When this happens there is no visual feedback for adjusting the point of aim which can leave the unprepared shooter with fewer options.

This is why a correct presentation/draw stroke, even on a laser equipped firearm, involves acquiring the sights (or at least some form of coarse sight picture). The shooter finds the sights and only then, if the projected laser dot is visible, they may switch their focus to the target and dot. This technique mitigates failures on the part of the shooter to find the dot and failures of the laser itself. If there is no visible dot, the shooter is already on the sights.

The next time you practicing with a laser equipped handgun, remember – sights first, then laser.

Powered by WordPress. Designed by Woo Themes