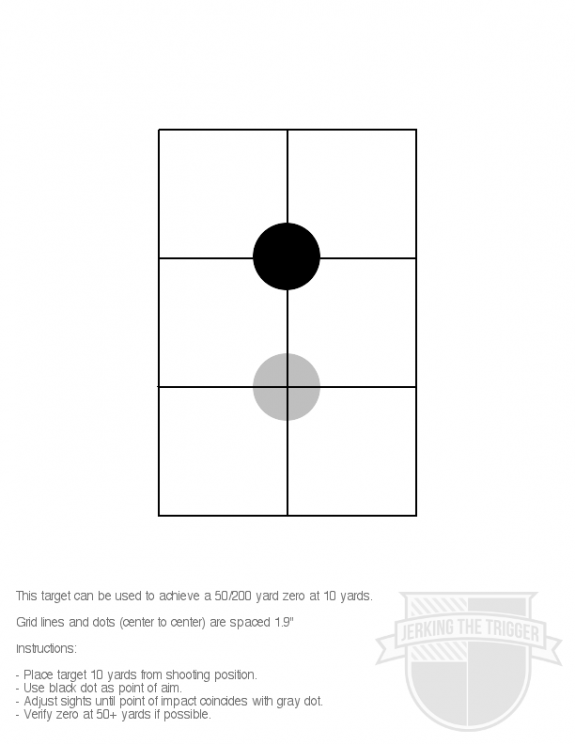
You may remember Frank Proctor’s method for achieving a 50/200 yard zero at 10 yards with your AR-15 that was mentioned here a few months ago. I have been putting it to good use. It is a very fast way to zero an AR-15 which is very convenient for me since many of my carbines are in a constant state of flux as I try various items for review.
I have used the method so much that I created a target for my own use to support the process. It is a simple target with a 1.9″ grid and two dots. The black dot represents your point of aim. The gray dot is 1.9″ below your point of aim (POA) and represents your point of impact (POI). This makes it easy to achieve the POA/POI relationship necessary to achieve the rough 50/200 yard zero at 10 yards.
Of course, it is best to refine your zero at distances greater than 10 yards. You should always check your zero at the actual zero distance when possible but this will get you close. I should also note that this is somewhat dependent on the height of your optic. 1.9″ should get you close for the typical height over bore of an AR-15 optic.
I highly recommend that you review Frank Proctor’s video on this zeroing method and my brief comments on how it worked for me before attempting it. It is a simple method but there are some caveats you will want to keep in mind.
You can click here to access the PDF. Be sure to print at “actual size”.
UPDATE: If you want to save even more time on the range, consider using this target for bore sighting at home. It works well because of the compressed distance for which it is designed to be used. Most people can find a 10 yard (30 feet) line of sight in their home. Just align your optic on the black dot and bore sight on the gray dot.
UPDATE 2: It may go without saying but this target can also be used to fine-tune your zero at a greater distance. If everything goes well with your initial work at 10 yards, you can then use the black dot to check your zero at 50 or 200 yards since it should be relatively free of impacts.
I prefer to check the zero at 50 yards quickly and then check again at 200 on a new target when possible. Keep in mind that, at 100 yards, your point of impact will be above the black dot if your point of aim is the black dot.
UPDATE 3: I receive multiple emails weekly about this target and its effectiveness with various other calibers and rifles. In the case of other calibers, the target will likely work but may require more fine tuning when you are able to shoot at distance (50 yards would be good, 200 would be better). If you want to be sure, you will have to put your numbers into a ballistic calculator or give it a try.


Thanks for all the great info on your site! Could you run a 100 yard zero through your ballistic program and publish the drop?
Tom, with a 100 yard zero, POI will be about 2.2″ below POA at 10 yards if my calculations are correct.
Thank you sir
Paul Howe has a similar method, but his is to start at 7 yards and it’s good out to 300.
it depends on how high your sights are above the bore if using stock ka2 (carry handle ) this will be zero somewhere around 300
Lets remember this is a speedy way to start zeroing, but you arnt zeroed unless you confirm AT the zero distance.
Right.
As a 0311 Marine we zeroed m4s at 25 meters poa and that was poi at 300 meters. (5.56 62gr. Tungsten penetrator ).
Incorrect. This statement (and others like it) is one of the reasons 5.56 gets a bad rap.
The ‘near/far zero’ concept (25/300, 50/200, and now 10/50/200) is more like an improved field boresight with live fire than an actual ‘zeroing’ method.
What is the POI at 100 yards with a 50/200 zero?
It is about 1.5″ high at 100 yards.