This recent video (below) from Frank Proctor at Way of the Gun and Trigger Time TV is excellent. In it, Proctor talks about why he uses the 50 yard zero, how to achieve a 50 yard zero at 10 yards, and the benefits of doing so. His 10 yard technique is very simple and it works.
I have tested this a bit since the video was posted a little more than a week ago and found it to be a very handy tool to have in my toolbox. I really like the speed at which I am able to establish the zero since I can see and make my adjustments from my shooting position. I like being able to zero on an extremely compact range and I can see how this technique could benefit those without the skill to shoot a group consistent enough to accurately judge what adjustments should be made at extended distances. However, I have also found some caveats that you will want to keep in mind when using this technique.
If you can confirm your zero at a longer distance, do so. This assumes you have both the space and the skill required. When establishing a 50 yard zero, it is good to check at 50 yards, better to check at 100 yards (point of impact will be high at 100), and best to check at 200 yards. I tested the technique with an iron sighted AR-15, a red dot equipped carbine, and a carbine equipped with a 1-4X magnified optic. All three were well within 2″ of my desired point of aim when I checked them at 50 yards but checking at distance allowed me to further refine the zero. The great news is that using just the 10 yard sight in, I was able to hit a 4″ target at 50 yards in all cases so it is great technique for getting a usable zero on a carbine very, very quickly.
If you need another reason to confirm at distance when and if you are able, consider this. The difference between a 50/200 yard zero and 100 yard zero at 10 yards is only about 1/10th of an inch (1.92″ below point of aim for the 50 yard zero versus 2.06″ below point of aim for the 100 yard zero). The difference between the two zeros opens up to 7/10s of an inch at 50 yards, 1.4″ at 100 yards, and so on. The point is pretty much any zero is going to put you somewhere near 2″ below point of aim at 10 yards and, without confirmation, you may not have the zero you think you have.
Beware of parallax! You will have to be very mindful of consistent head placement when using optics well inside of their intended parallax range. Even optics that claim to be parallax-free will exhibit a shift in point of impact if you shift the position of your eye behind the optic. Basically, you need to position your eye so that the aiming point is in the center of the optic every time. This is good practice whenever you zero regardless of distance but it is vital when you are this close.
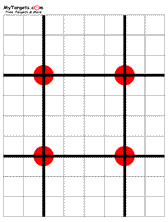
 A good target helps. I like Proctor’s field measuring technique of using your finger but also found that a good target helps. I was going to make my own but I came across this target from MyTargets.com and it works well. The target has 4 aiming points laid onto a full page 1″ grid. You can aim at the dots and move your point of impact to the grid point 2″ below the dot. It’s extremely easy and the grid can help you make informed adjustments to your optic/sights.
Be picky about your adjustments. At 10 yards, your mechanical adjustments will be very, very fine. An optic with adjustments that move point of impact 1/4″ per click at 100 yards will require 10 clicks to move 1/4″ at 10 yards. A group that looks “pretty close” at 10 yards can be off by quite a few inches at 50 yards. It is important to follow Frank’s advice in the video about not adjusting off of your group unless the shots in that group are touching. This level of precision will ensure that you have solid data with which to make your adjustments. It also gives you a clearer picture of the minute adjustments necessary at 10 yards to translate to a solid 50/200 yard zero.

Comments are closed.